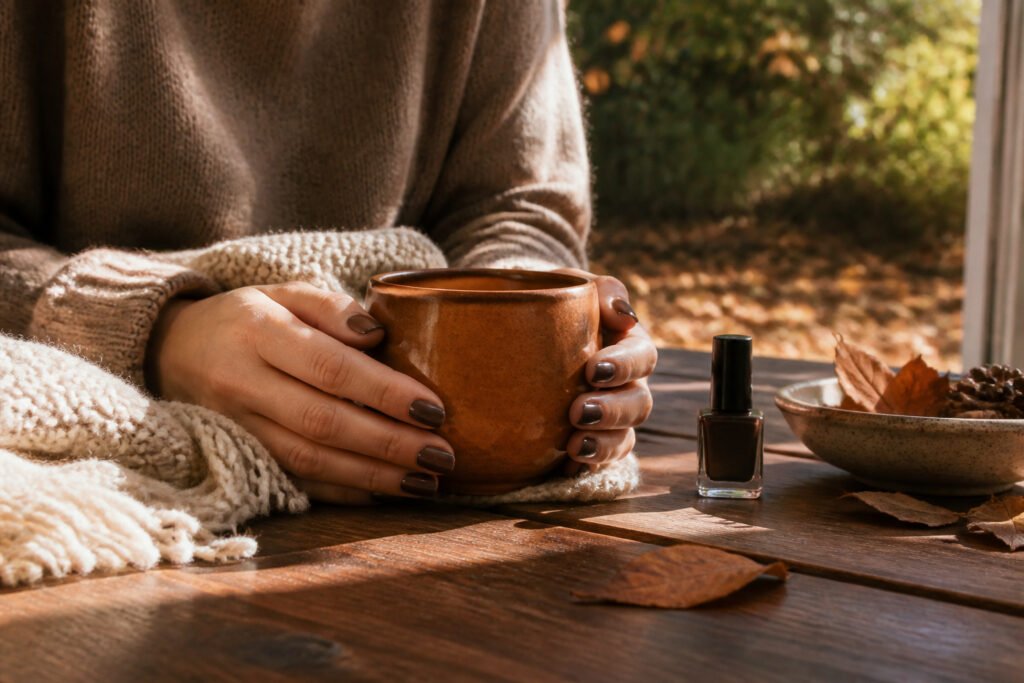
November nails are the muted, warm-toned manicures that bridge late autumn and early winter, built from browns, burnt oranges, and quiet metallics rather than the bright Halloween palettes that precede them. The trick is choosing shades with enough yellow in the base to survive the loss of summer color in your skin; a caramel that tips orange under daylight will read traffic-cone by Thanksgiving, while one that stays in the cocoa family mirrors the camel coats and oatmeal cashmere already in rotation. LB162 Keep Loving and LB024 Exposed get this right, as do the layering pairings of LB165 Vanilla Ice Cream and LB134 Lovely Folliage.
1. Coco Caramel
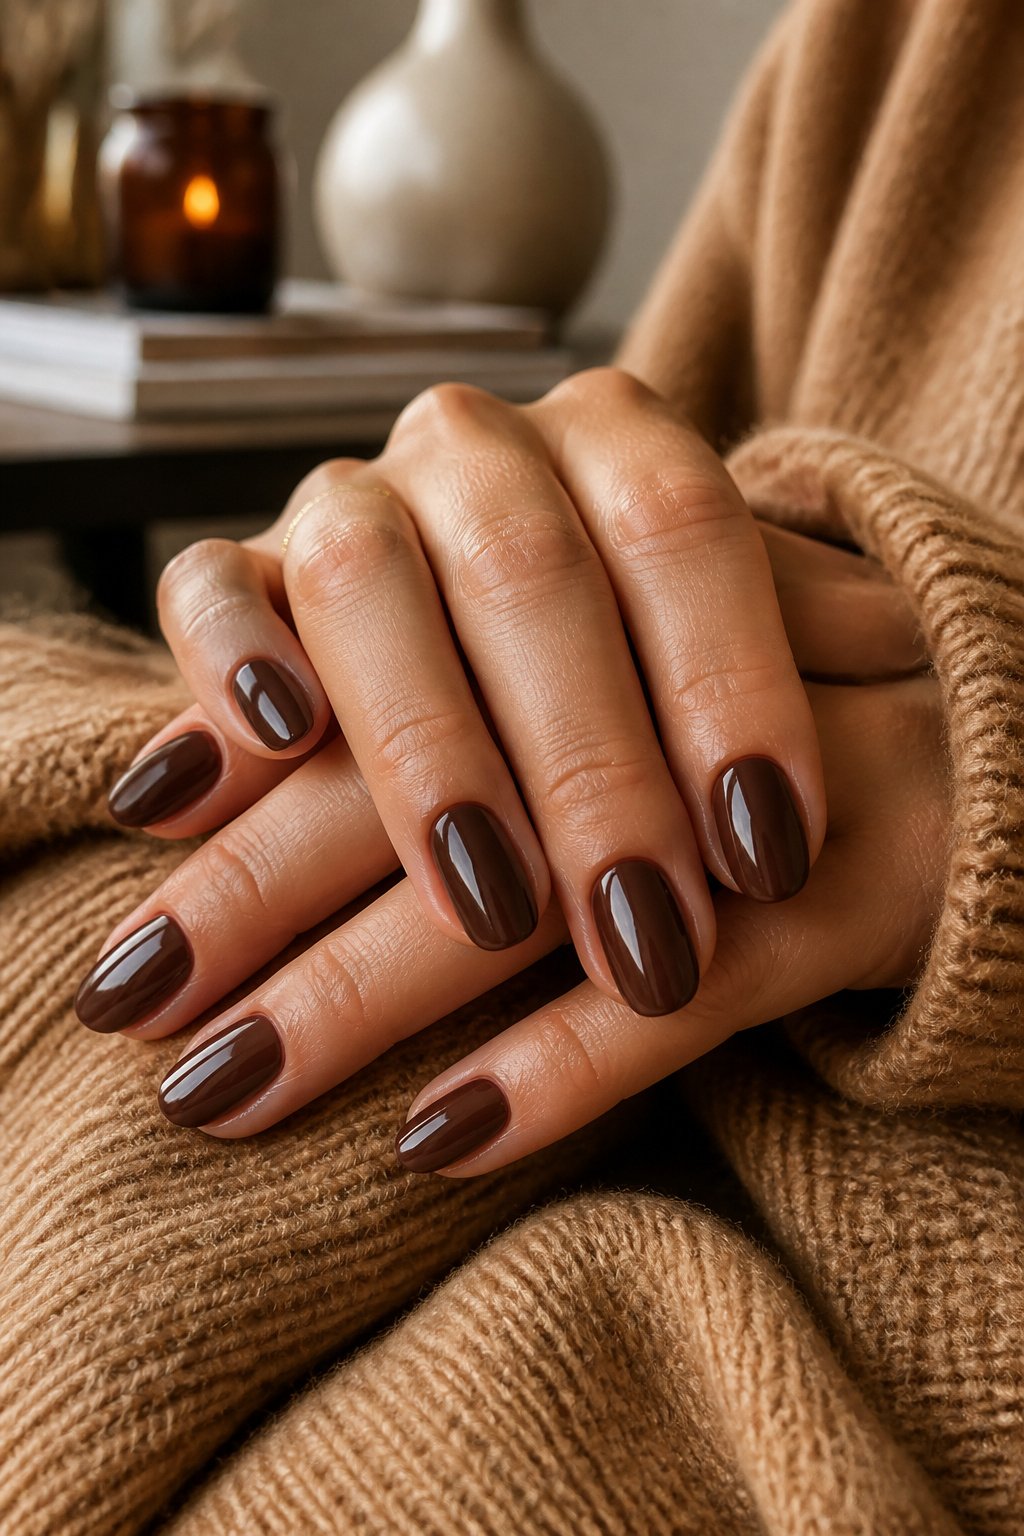
Brown nail shades with real warmth, not that orange undertone that turns pumpkin-spice on the nail, are what carries November. The trick is choosing a caramel that stays in the cocoa family, deep enough to read sophisticated against skin that has lost its summer color. I learned this the hard way last year with a shade that looked toasted in the bottle and traffic-cone under daylight.
The tone works because it mirrors what most of us already pull from our closets this month: camel coats, cream knits, oatmeal cashmere. It does not fight the wardrobe; it extends it. A chocolate-brown nail against a camel sleeve reads intentional, expensive, quiet.
The product range that gets this right includes LB162 Keep Loving and LB024 Exposed, both warm without tipping orange, plus LB165 Vanilla Ice Cream and LB134 Lovely Folliage for layering. These are the shades I would reach for if I wanted one manicure to carry straight through Thanksgiving without looking like I was still hanging onto October.
2. Cozy Season
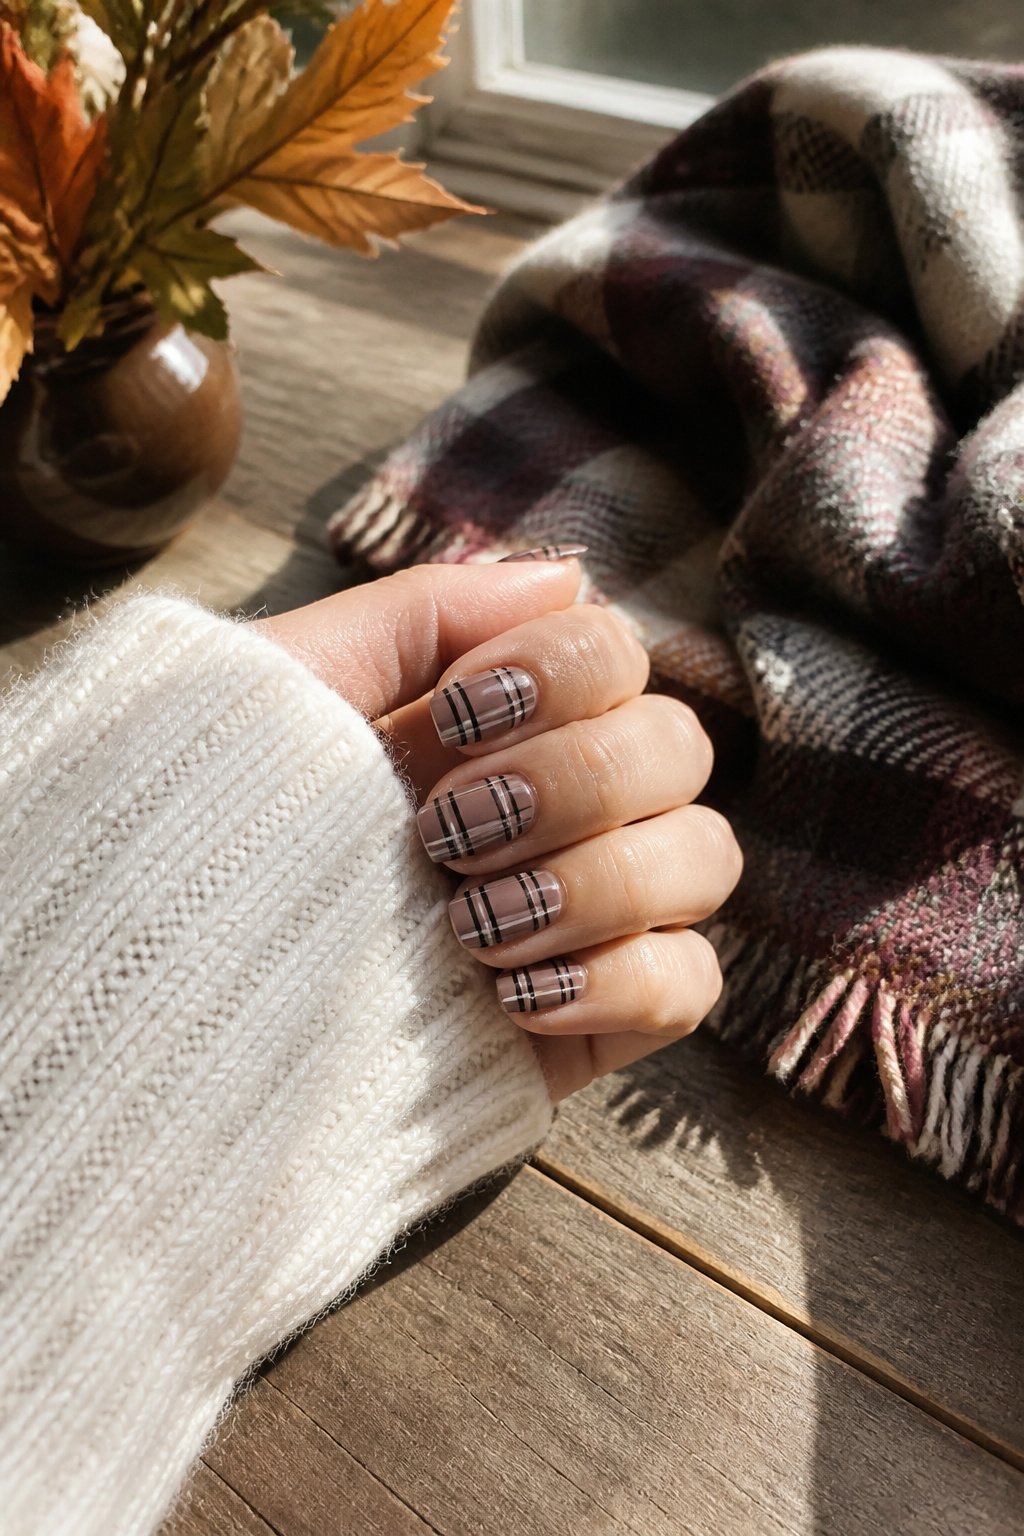
Plaid nails work best when the pattern actually looks like something you would wear, not like a tablecloth that wandered onto your fingertips. A two-tone windowpane in black and white over a nude base reads clean and modern; three-color tartan in red, brown, and cream feels closer to a real blanket. The safest move is a single accent nail, usually the ring finger, so the design does not overwhelm the rest of the hand.
The nude base matters more than the plaid itself. DD177 Teddy Bear, a warm brown-leaning nude, avoids the sickly pink that cool undertones turn against autumn skin.** That pink-gray cast is what makes nude nails look like a medical concern instead of a deliberate choice. Warm undertones in the base pull the whole look toward flannel and wool instead of away from it.
For a full plaid set, the same Teddy Bear base layers under thin lines of DD179 Brown Sugar, Jet Black, and Pure White. The brown keeps it grounded; the black and white supply the grid. Clear dip powder underneath gives the color its depth without adding bulk.
3. Negative Space
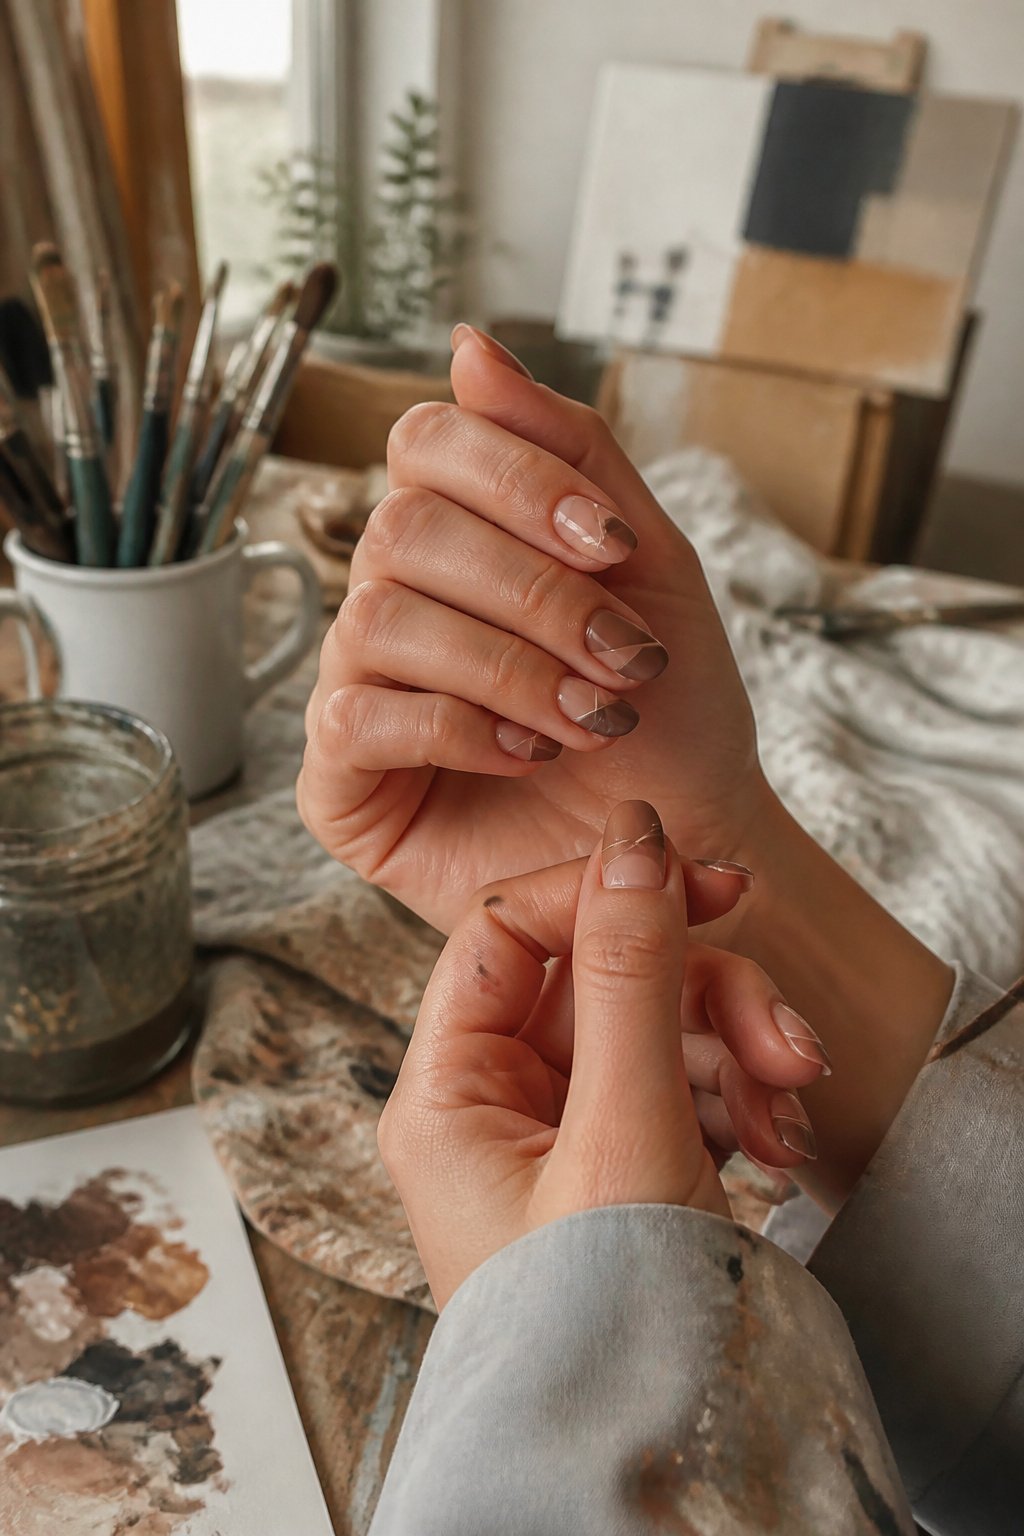
Bare nail showing through deliberate gaps reads cooler than a fully painted surface, and November is the right month to try it because the neutral skin tone against autumn polish feels intentional rather than unfinished. The cut-out method sounds simple until you time it wrong.
Base coat goes on first and dries fully. Striping tape or vinyl stencils get placed where you want the negative space to stay bare. Color layer brushes over everything, and then you peel before the polish sets, which for most formulas means roughly thirty to forty seconds after the last stroke. Wait too long and the tape lifts the color underneath with it; peel too early and the edges feather. I needed three full attempts before I found the window where the polish was dry enough to hold a crisp line but wet enough to release cleanly. The third try sat for what felt like a blink, maybe thirty-five seconds, and lifted off leaving the sharp gap I wanted. A quick-dry top coat seals it without dragging the design.
4. Dreamy Clouds
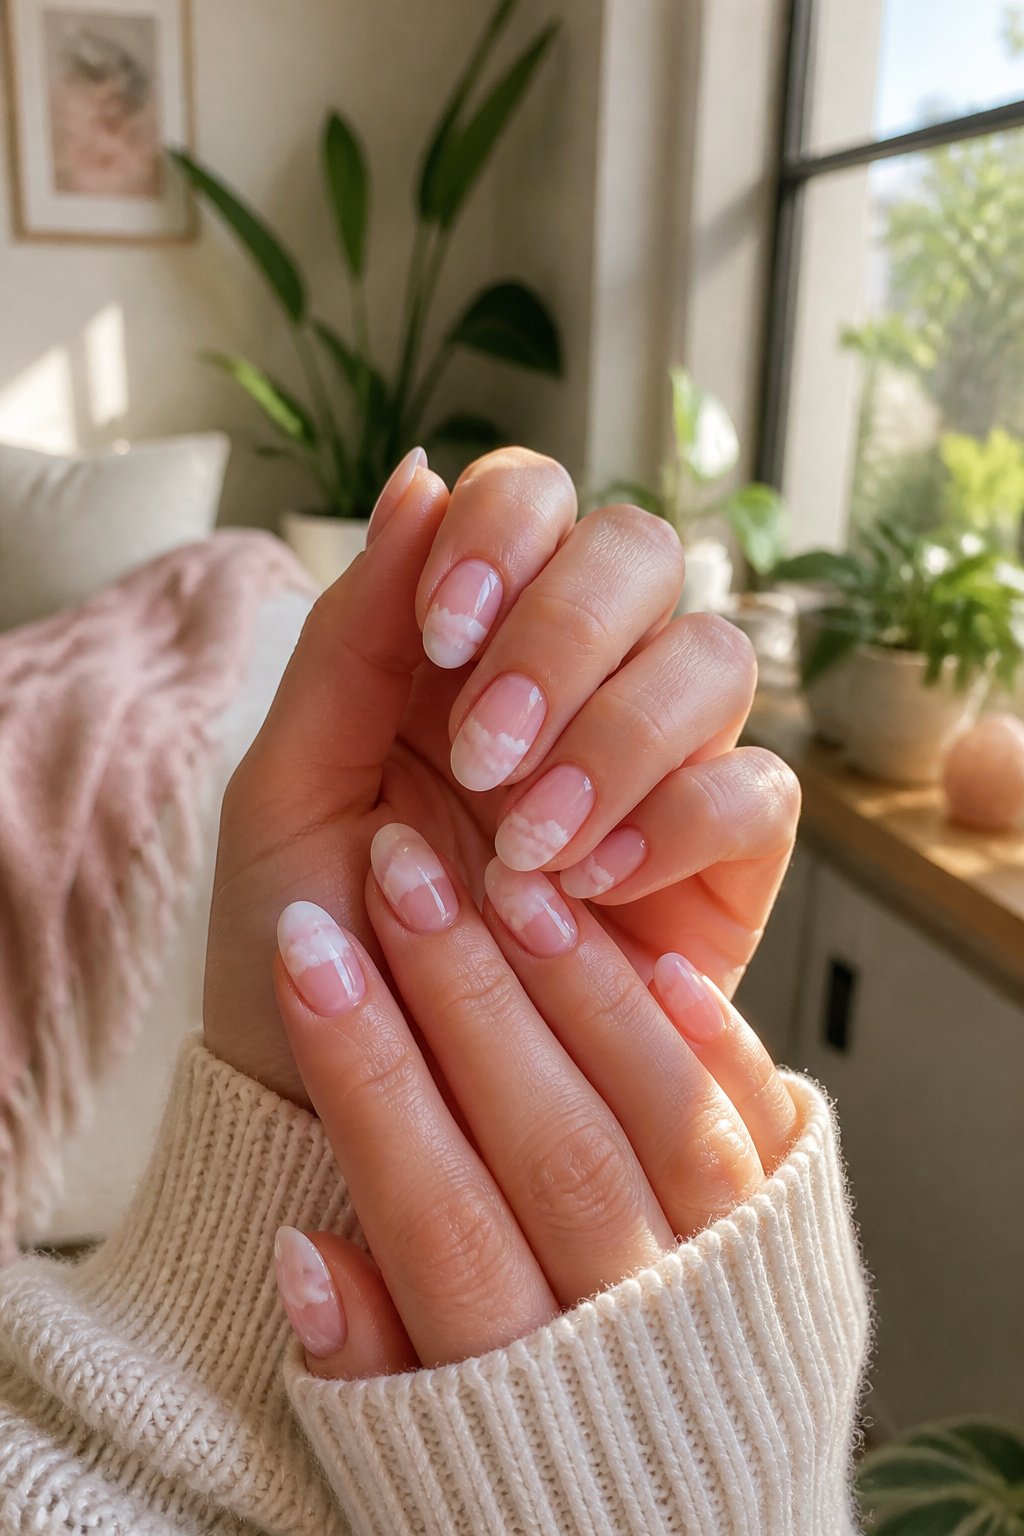
The sponge technique is what separates a cloud manicure from a flat white nail. A makeup wedge, not a brush, lays down the polish in two or three sheer passes so the edge feathers naturally. The base coat stays clean and bright, and the white sits higher at the cuticle, softer toward the free edge, like actual sky rather than a stripe.
That brightness is what keeps this reading as November rather than January. Deep winter nails tend toward the flat greys and muted taupes that match slush and overcast sky. A cloud manicure keeps the white luminous, the gradient gentle, a reminder that winter is still arriving, not settled in. The feathered edge should look accidental, not airbrushed; too perfect and it loses the weather reference entirely.
Igelbeauty’s take on this used DD001 Baby Powder for the white and DD176 Ruffle Trim underneath, which gives the cloud dimension without drifting into color. The whole point is restraint. One accent nail per hand, or a full set if the gradient stays whisper-thin. Anything heavier and you are back to January.
5. Festive Foils
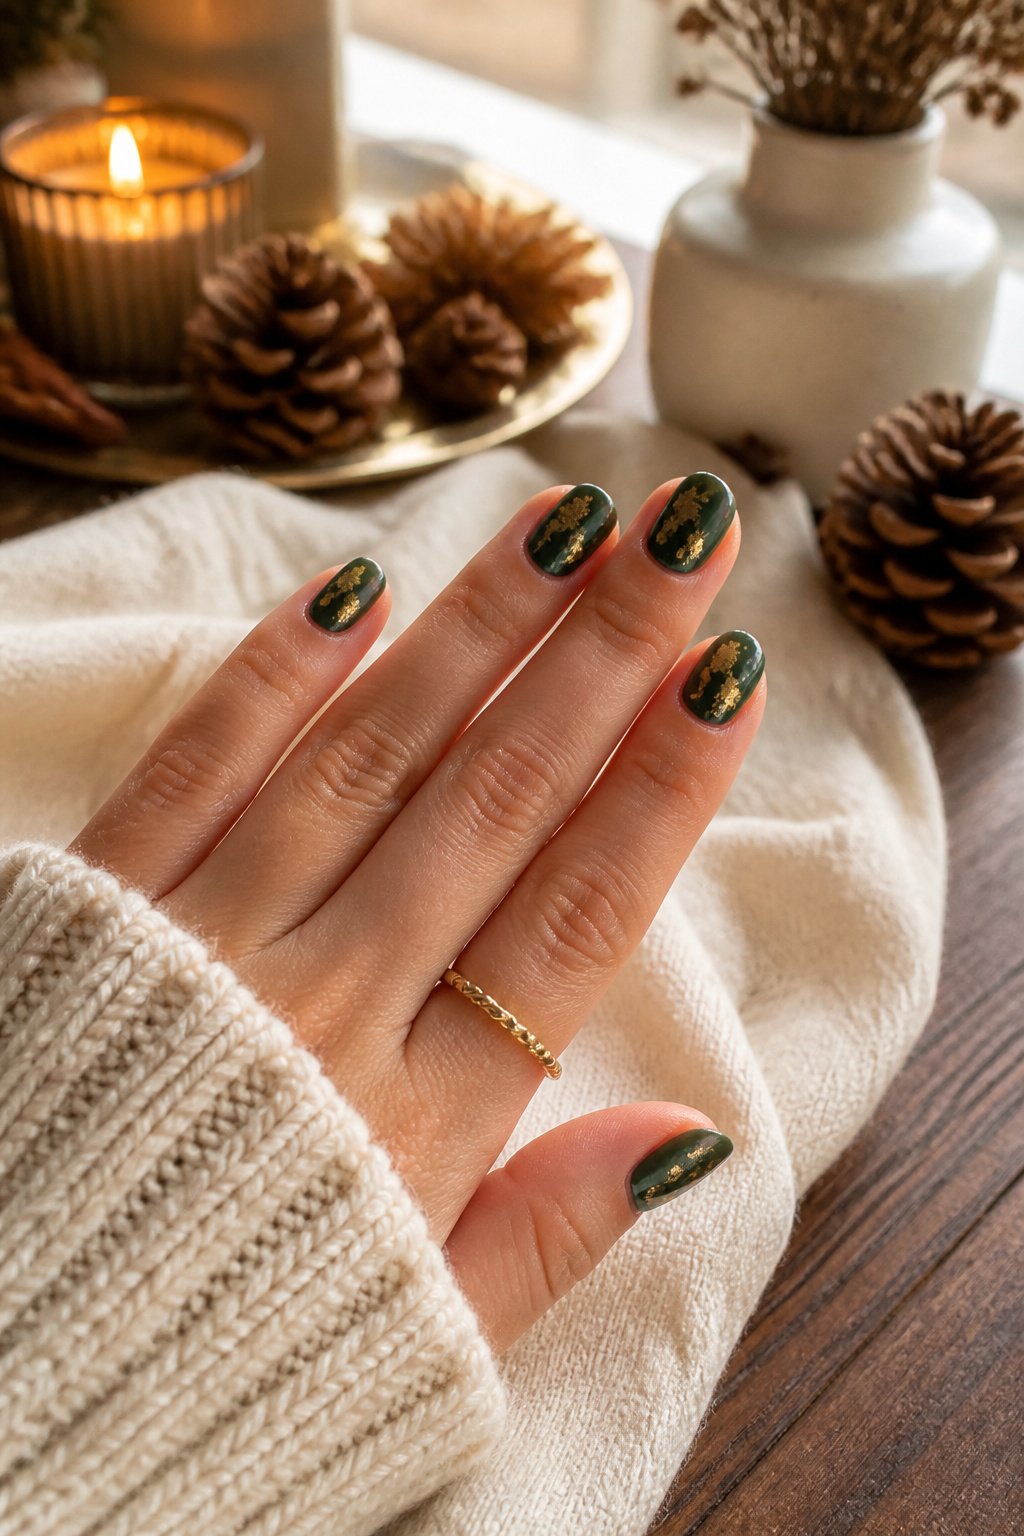
Low November light does strange things to metallic polish. Full-coverage foil, laid from cuticle to free edge, turns almost mirror-like by late afternoon and catches the last bit of sun through a kitchen window. That same foil scattered as thin shards or a single diagonal slash reads quieter, more like jewelry than tinsel.
Forest green and chocolate brown bases let the metallic sit back rather than shout. Deep burgundy works too, though the red family can tip toward holiday-party territory faster than you expect. I have seen silver foil on burgundy look expensive in one photo and like a gift bow in another; the difference was coverage, not color. Full foil on dark green looked like oxidized metal, which felt right for the month. Scattered accents on brown looked like something you already owned.
The base needs to be opaque. Two coats minimum, cured or dried hard, or the foil adhesive lifts pigment and the finish goes patchy. A matte top coat over foil kills the point entirely; use high-gloss or skip the layer.
6. Tanned Hearts
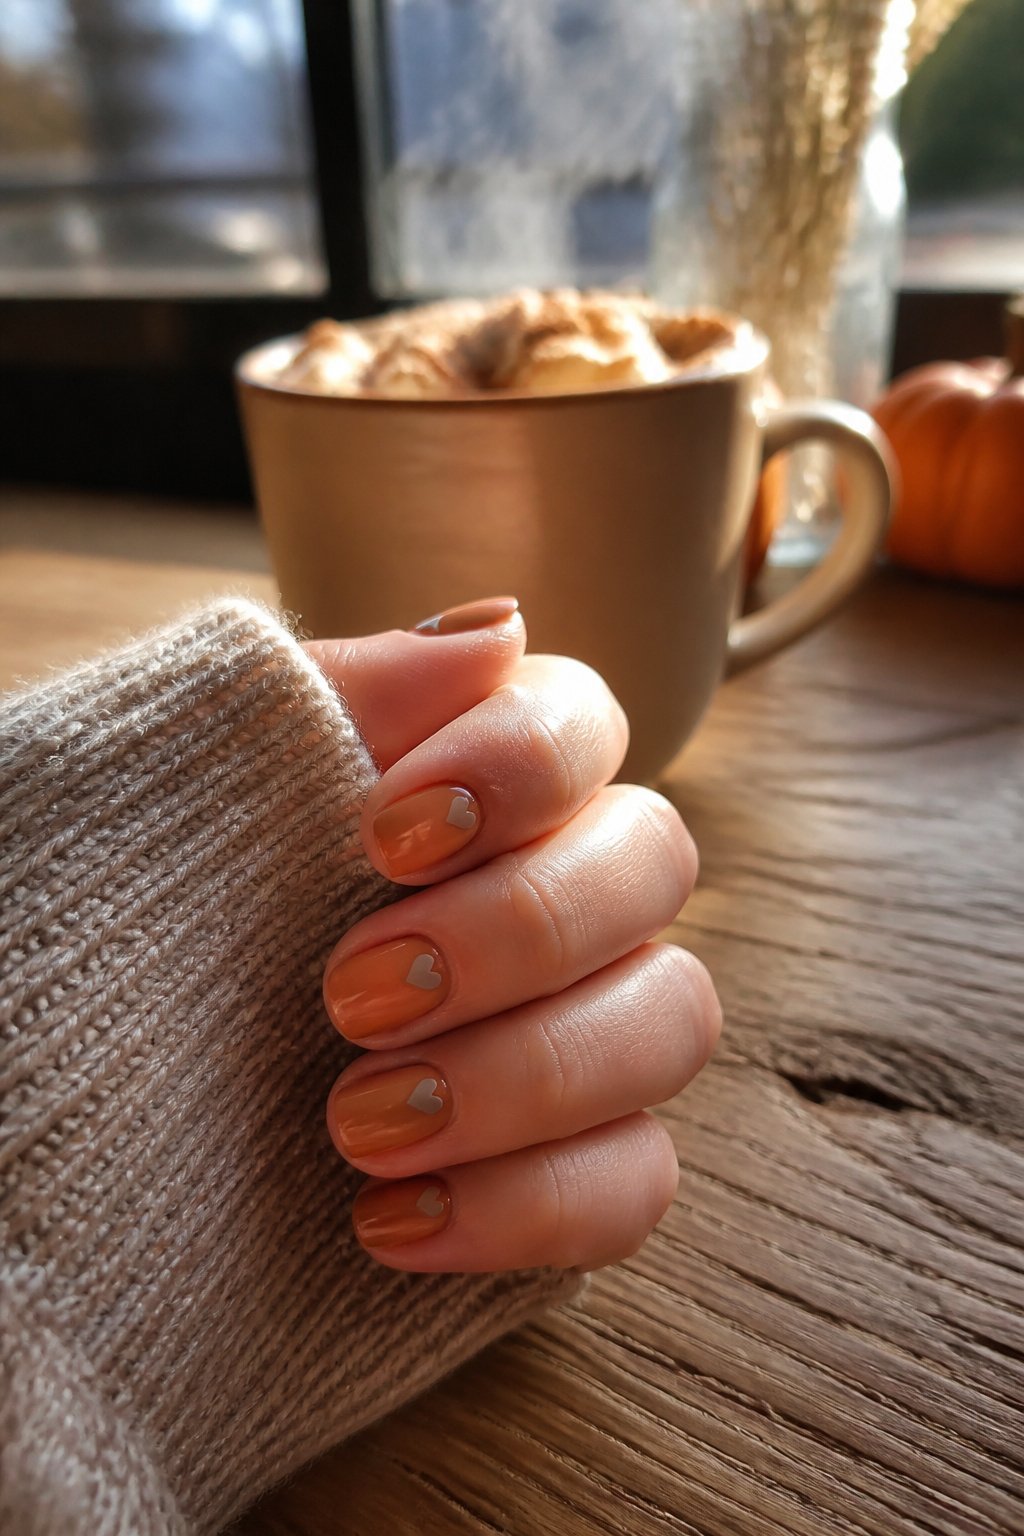
Tan reads flat on winter skin, but a shade with real yellow in it keeps the warmth going even when the sun has not. I look for colors closer to camel or warm khaki than true nude, which can pull gray once the last outdoor color fades from your hands.
Heart motifs on these bases work best when they look placed by eye, not plotted by machine. I like one heart off-center on the ring finger, or a scattered trio where the sizes differ slightly and no two sit at matching angles. Symmetry here feels like a sticker sheet; the slight unevenness is what makes it look drawn on with a brush at a kitchen table.
For placement, think about where your eye actually travels when someone gestures. A small heart high on the nail, near the cuticle, catches light differently than one floating in the center. I tend to put the smallest detail on my dominant hand, since that one moves more and does not need the extra weight.
7. Matte Cable Knits
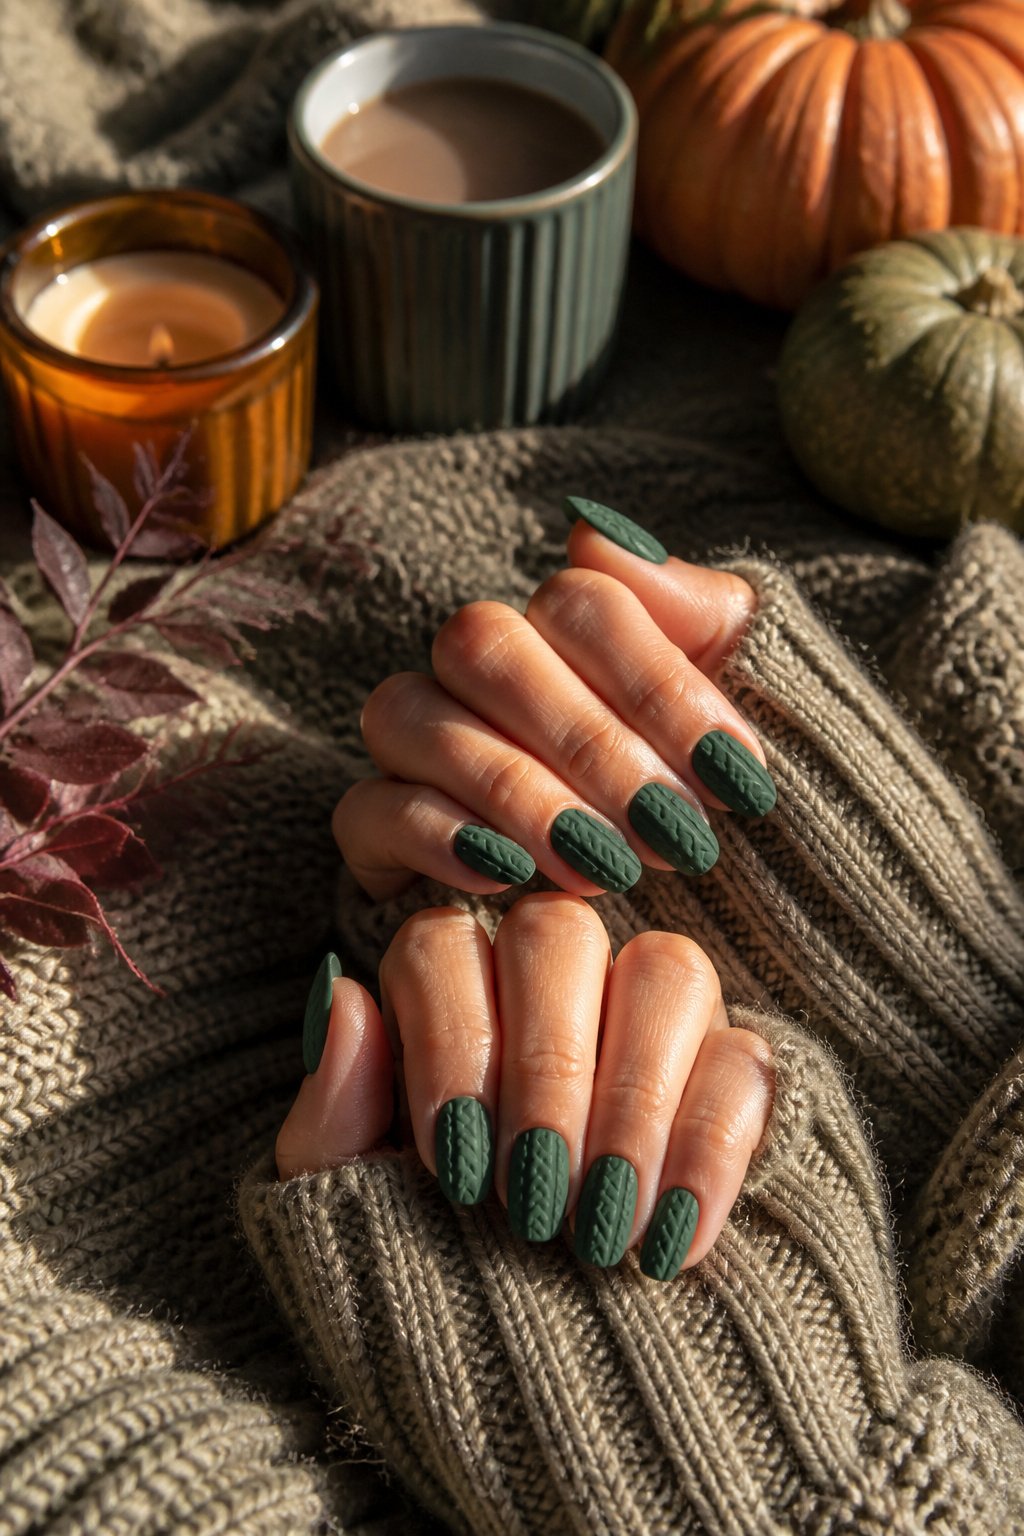
Matte cable knits work because the finish reads like actual wool rather than costume jewelry. The texture comes from a silicone nail art mat or a braided impression tool pressed into uncured gel, building raised ridges that mimic a sweater’s weave. I learned the hard way that a glossy top coat destroys the illusion entirely; light bounces off every peak and valley until the surface looks like melted plastic pooled over ridges. Matte top coat absorbs that glare and leaves the eye reading depth and fiber instead of shine. The sources point to iGel Matte Top Coat as the finishing layer that keeps the effect believable, paired with shades like LB144 Moonlight Path or DD260 Effortless for the kind of muted, wearable color that actually shows up in November wardrobes. Skip the shimmer additives here; any pearl or sparkle catches light the same way gloss does, flattening the texture back into something synthetic.
8. Autumn Leaves
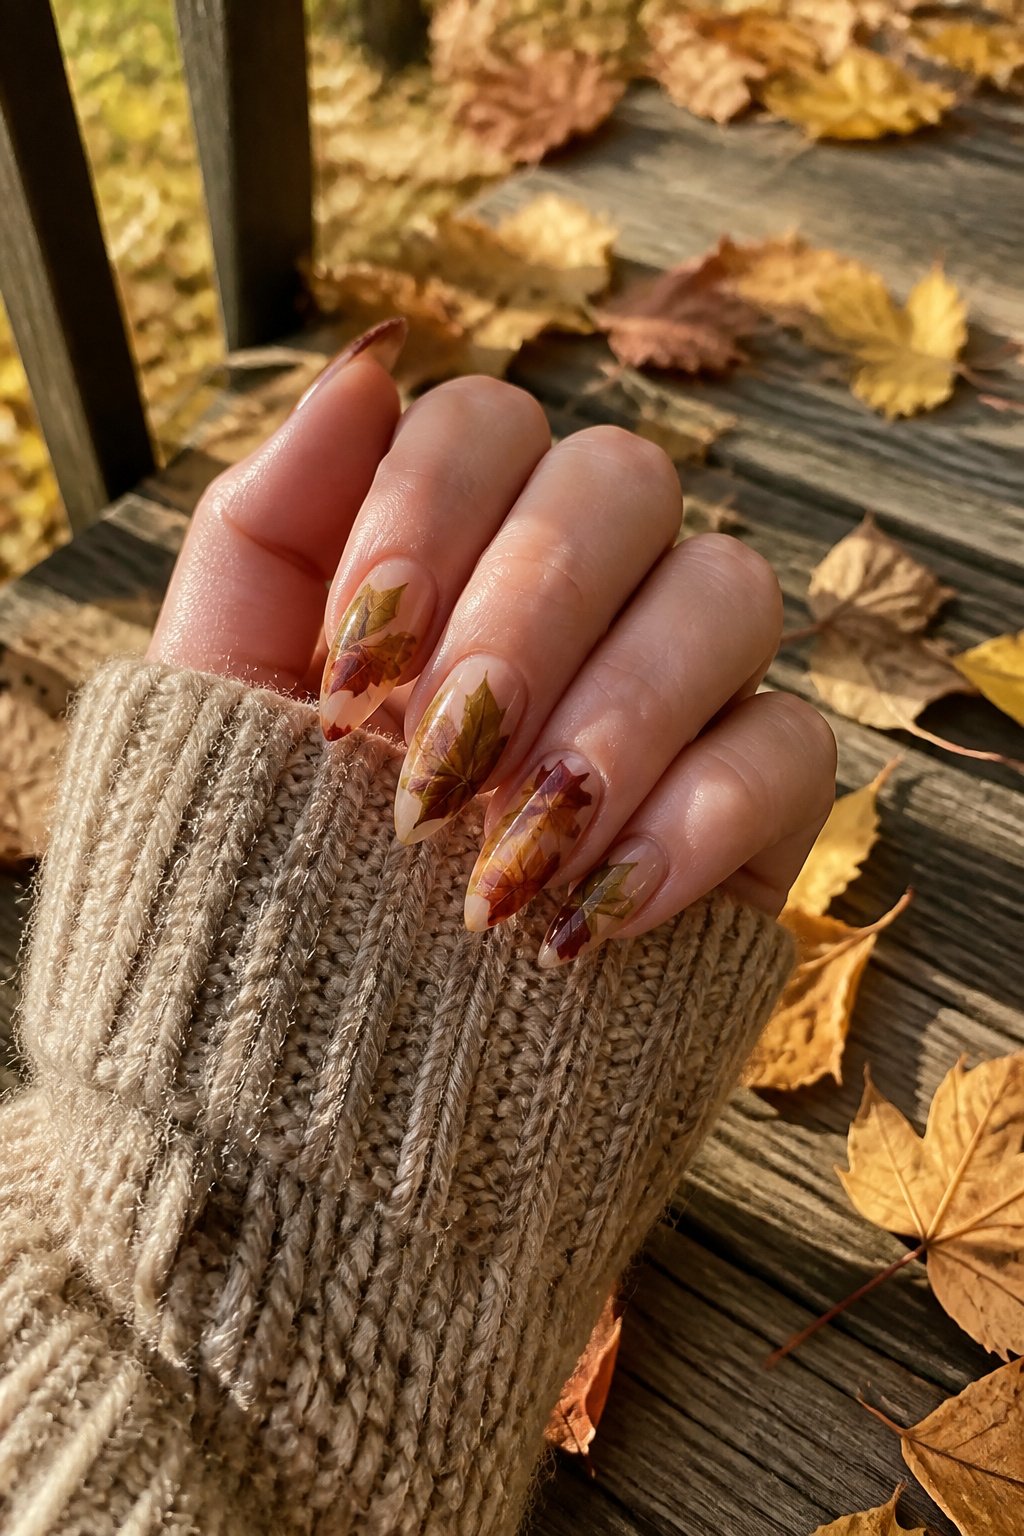
Maple leaves hold their shape on a nail in ways oak leaves never will. The pointed lobes stay crisp even at small scale, while rounded oak edges blur into an indistinct blob once polish spreads.
The trick to selling the turning-leaf effect is a three-color gradient that runs stem to tip, not side to side. I start with a warm olive or deep gold at the cuticle end, shift to burnt orange through the middle, and end with a dark rust or near-brown at the free edge. The stem itself gets a thin line of dark brown or black to anchor the whole shape.
Pointed lobes, not rounded edges, and the gradient must move lengthwise or the leaf reads as striped rather than changing. I have seen artists try to blend the colors with a sponge, but a fine liner brush and three distinct passes give better control at this scale. Let each layer dry to the touch before adding the next, or the middle orange muddies into the surrounding tones.
A single accent nail per hand usually carries the full leaf; the others get a wash of the mid-tone orange or a scattered few tiny falling leaves in the same palette.
9. Astro Brown
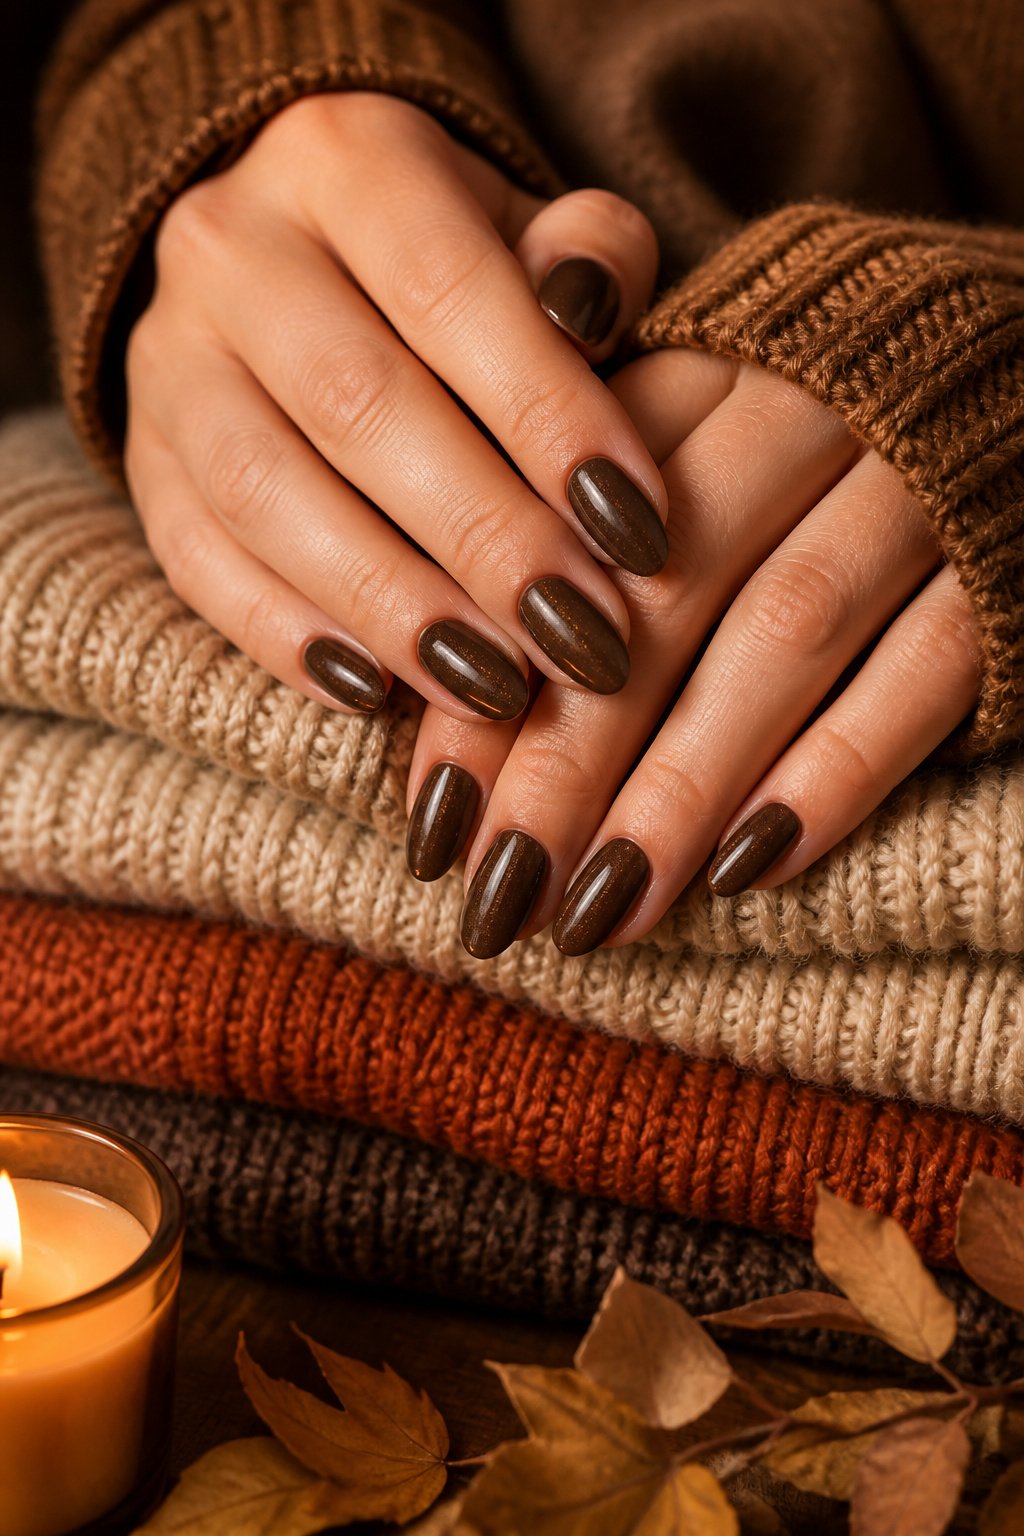
Shimmer sits on the nail surface differently than glitter, and that distinction is what makes Astro Brown wearable past Thanksgiving dinner. Shimmer particles are fine enough to catch light only when your hand moves, so the brown reads as sun-warmed skin rather than a craft-project sparkle. Glitter chunks, even small ones, fracture the color and turn any neutral into a party shade.
The particular brown in this look carries enough yellow undertone to stay warm without sliding toward orange. In dim November light, it still registers as something that happened outdoors, not something that dried muddy on the brush. I have seen cooler browns go straight to chocolate milk territory under kitchen fluorescents; this one holds its warmth.
Application matters for the effect. Two thin coats let the shimmer distribute evenly; a third coat starts building visible texture, and then you are back to fighting glitter logic. The movement-based flash means you notice your own nails while typing or reaching for a mug, which is the right frequency for a color you will live with for two weeks.
10. Angelic Nude
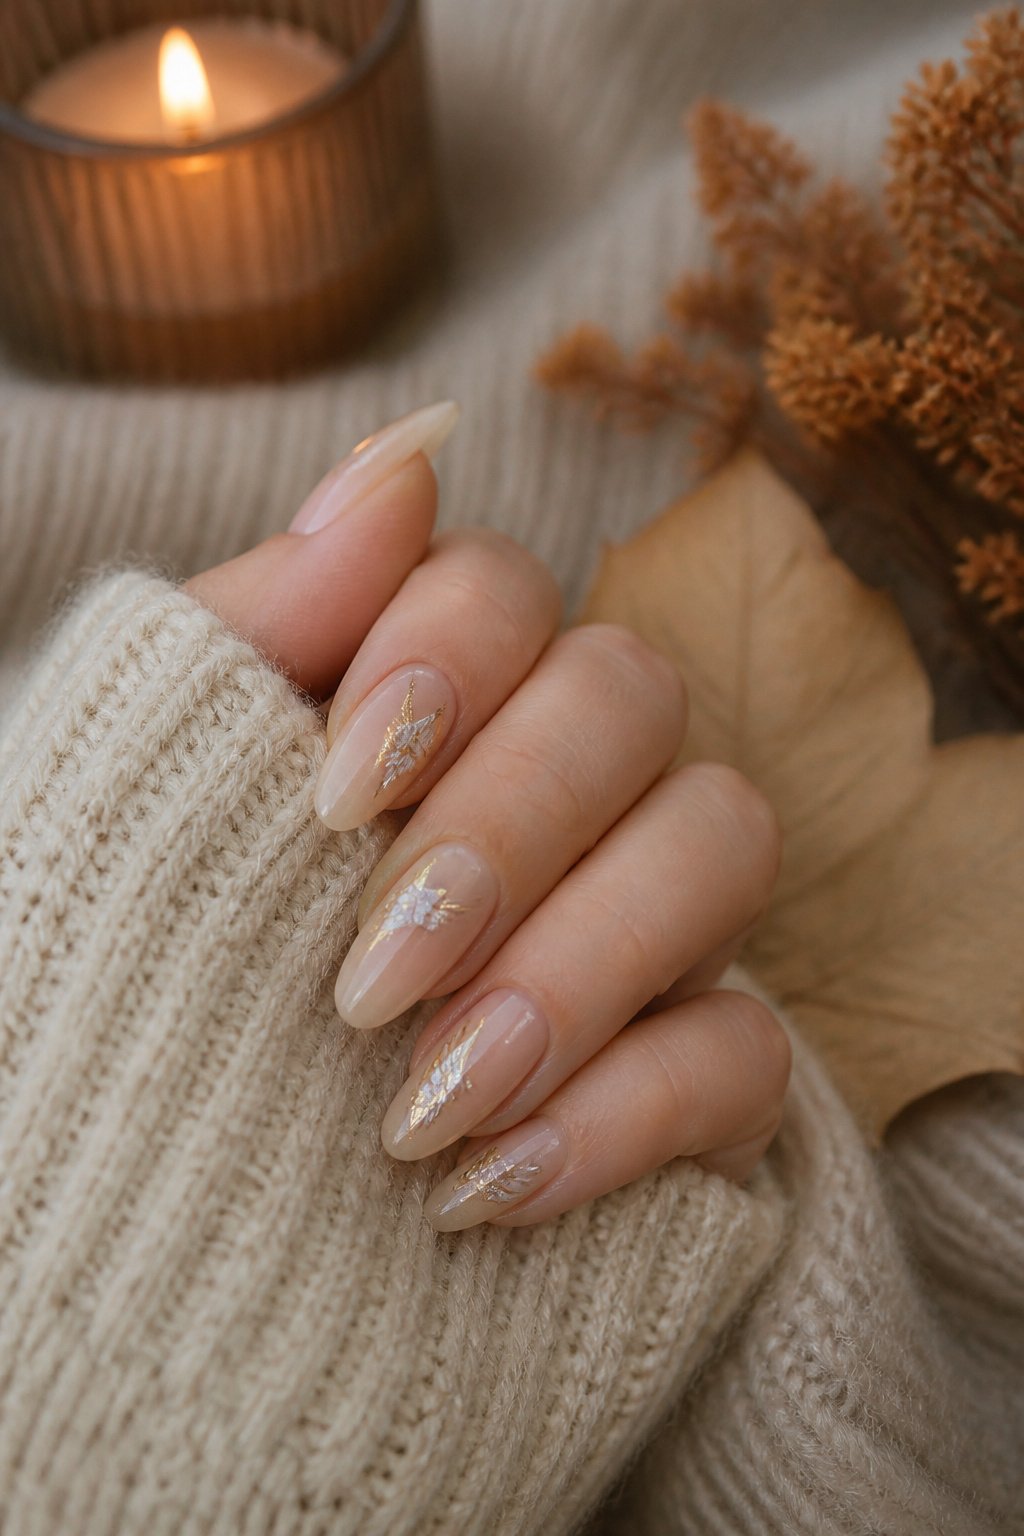
A gold undertone is what saves this look from reading as office beige. The warmth catches indoor light the way flat nudes never do, and against the muted palettes of November sweaters it registers as intentional rather than apologetic.
The angel or wing detail stays tiny enough to miss at arm’s length: one per nail, or a single accent on the ring finger. Anything larger turns devotional, which is not the point. The source pairings that work are a pure white like iGel’s Baby Powder for the figure itself, laid over their Teddy Bear as the base. A no-cleanse top coat keeps the relief from catching on wool sleeves, which matters more than you’d think by late November when every layer has a texture.
Placement is the judgment call. A wing tip following the free-edge curve reads as jewelry; centered on the nail bed, it reads as craft project. The first option wins if you type for a living or handle bread dough on Thanksgiving morning.
11. Marble Madness
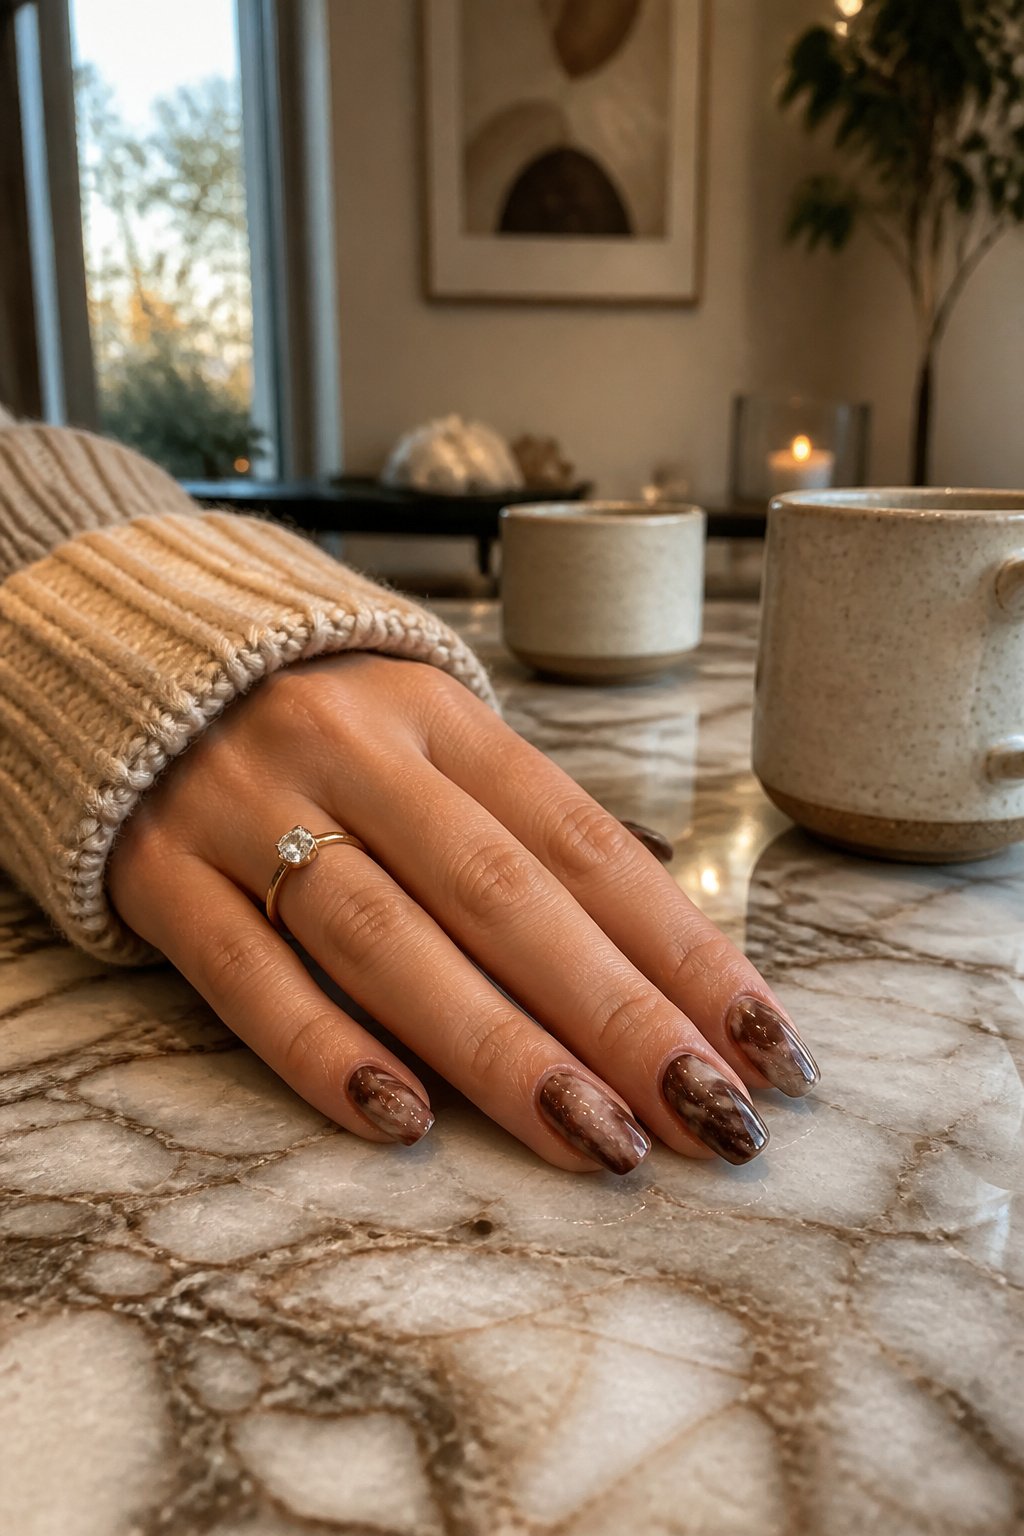
Brown marble nails read expensive for about three dollars in polish, and the November palette of chocolate, camel, and espresso makes the look feel seasonal rather than dated. Two techniques get you there, and they behave nothing alike.
Water-marble builds the swirling veins you see on Italian countertops. You drip polish onto water, drag a toothpick through the rings, then dip your nail through the film. The polish has to be thin enough to spread on the surface without beading; most mainstream cremes in the standard brown range work, though anything labeled "quick-dry" or "gel effect" usually drags and tears. I have watched three bottles fail this test on my kitchen table, all from the same brand’s newer formula.
Dry-brush gives a softer, clouded effect that looks like stone viewed through fog. You wipe almost all polish off the brush, then drag what’s left across the nail in quick, uneven strokes. No water, no timing, no cleanup of a skinned-over cup. The same thin polishes work here, but the dry-brush method forgives a slightly thicker formula because you are not asking it to float.
Between the two, dry-brush wins for a weeknight. Water-marble wins for the one event where someone might actually study your hands.
12. Line Art
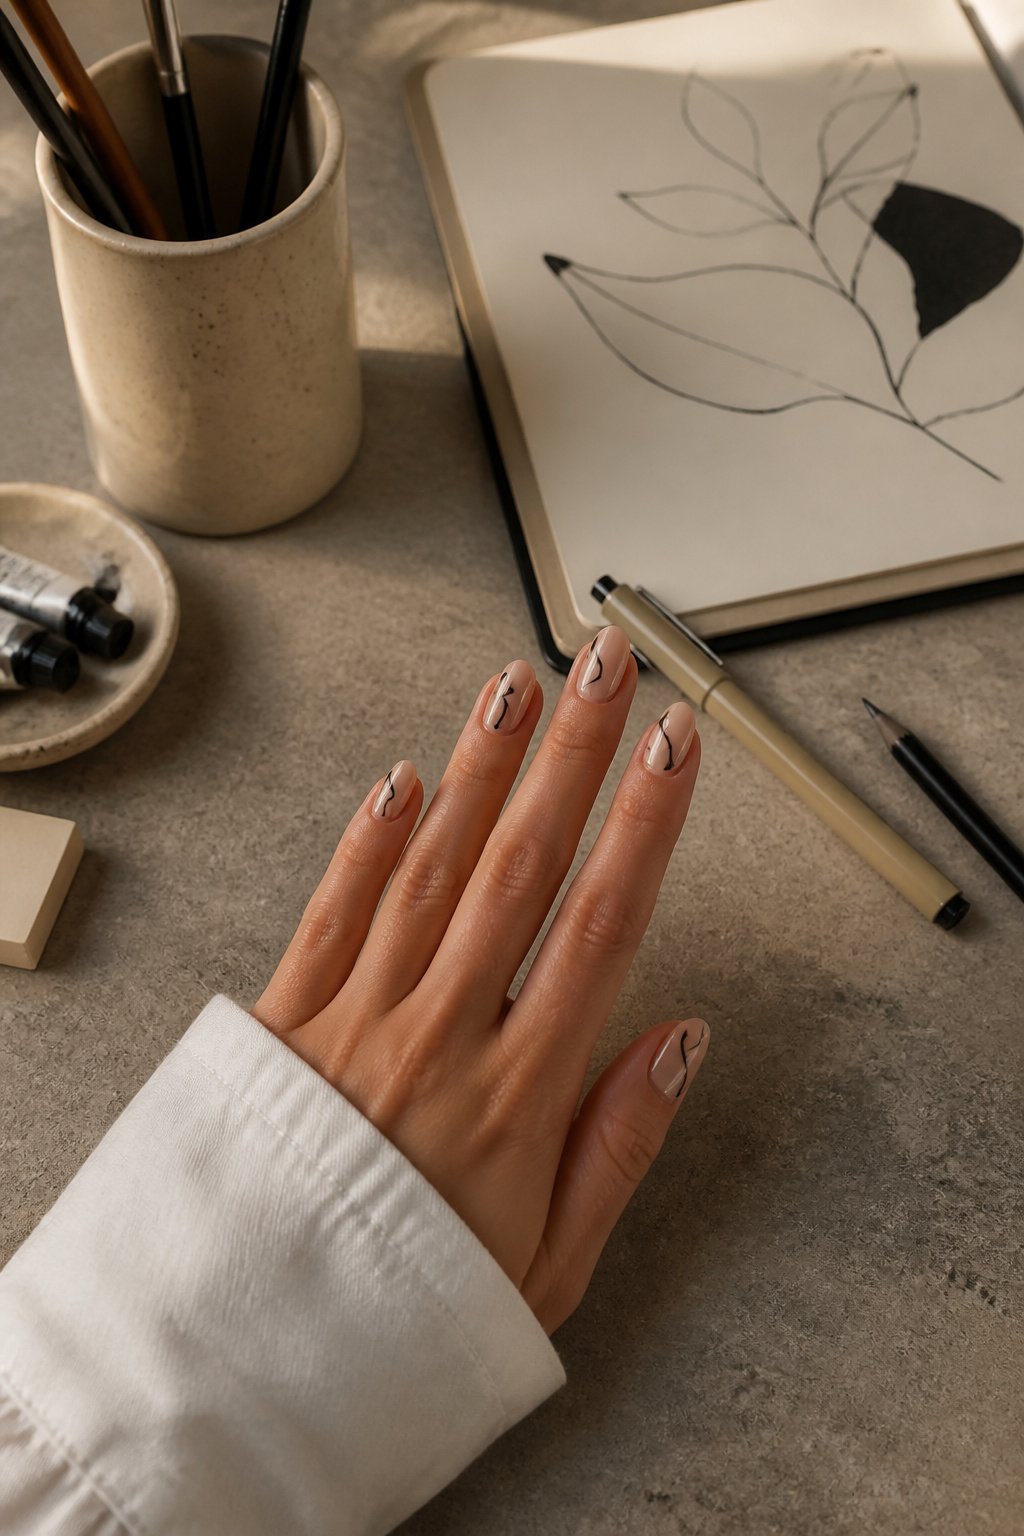
November’s muted light asks for restraint, and line art delivers it without looking unfinished. The look is simple: thin black strokes over bare nail or a single coat of soft white, forming leaves, stems, or abstract geometry that stops before it crowds the whole nail.
The brush matters more than the polish. A striper brush held vertical to the nail, not angled like a paintbrush, gives the steady pressure that keeps lines uniform. The tip does the work; your fingers stay still and you move the whole hand closer or farther from the light.
Summer line art in coral or turquoise reads playful, but November’s gray afternoons suit black and off-white better. The same design that felt beachy in July turns architectural now, something you notice across a dinner table rather than across a room.
A steady hand helps, yet the real control is in how little you load the brush. Too much polish pools at the start of a stroke and ruins the taper. Two light passes beat one heavy one every time.
13. Plain and Simple
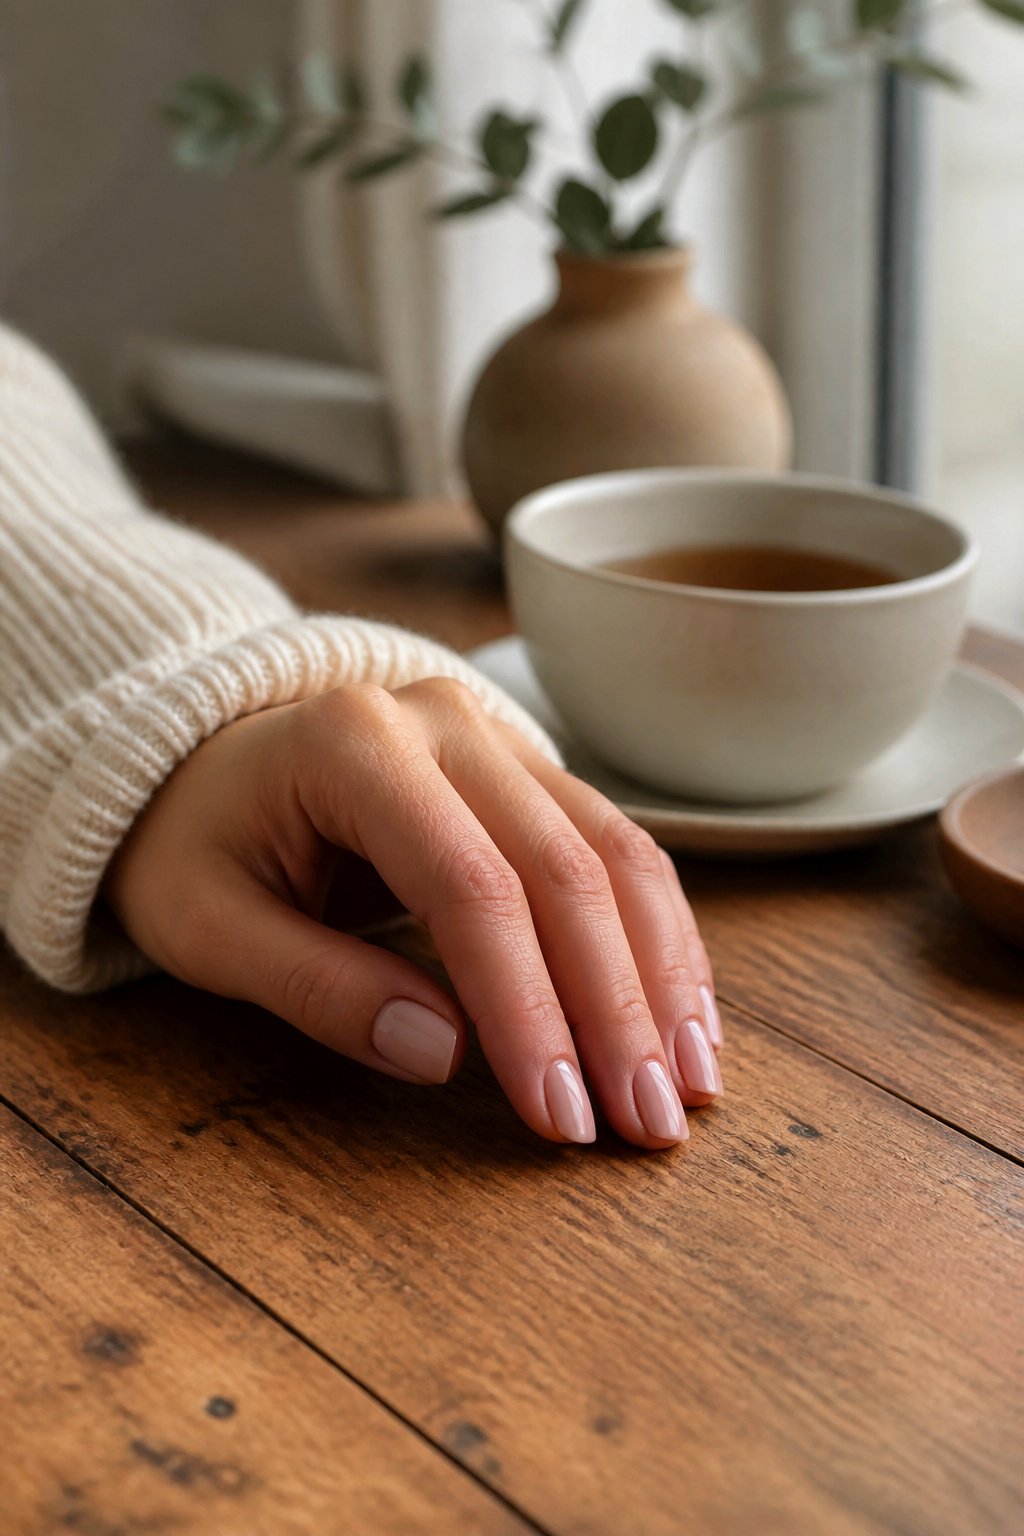
The sheer nude manicure lives or dies at the cuticle line. A thin veil of neutral polish, just enough to even out the nail bed without reaching full opacity, lets the natural color read as intentional rather than unfinished. That transparency is the whole point, which means every brush mark, every flooded edge, every stray pigment particle sits in plain sight.
Cleanup here is not a finishing step; it is the design. A dark polish forgives a wobbly sidewall. A glitter or art element draws the eye away from imperfect application. On a bare nude, the eye goes exactly where the mistake is. The same acetone-soaked brush that tidies up after a red manicure becomes, for this look, a tool you use between every coat: along the cuticle after base, again after color, once more before topcoat. The margin for error is literally the width of a skin cell, and on Thanksgiving weekend when you want something polished that does not compete with the table setting, that precision is what makes the look feel expensive rather than empty.
14. Butterfly Haven
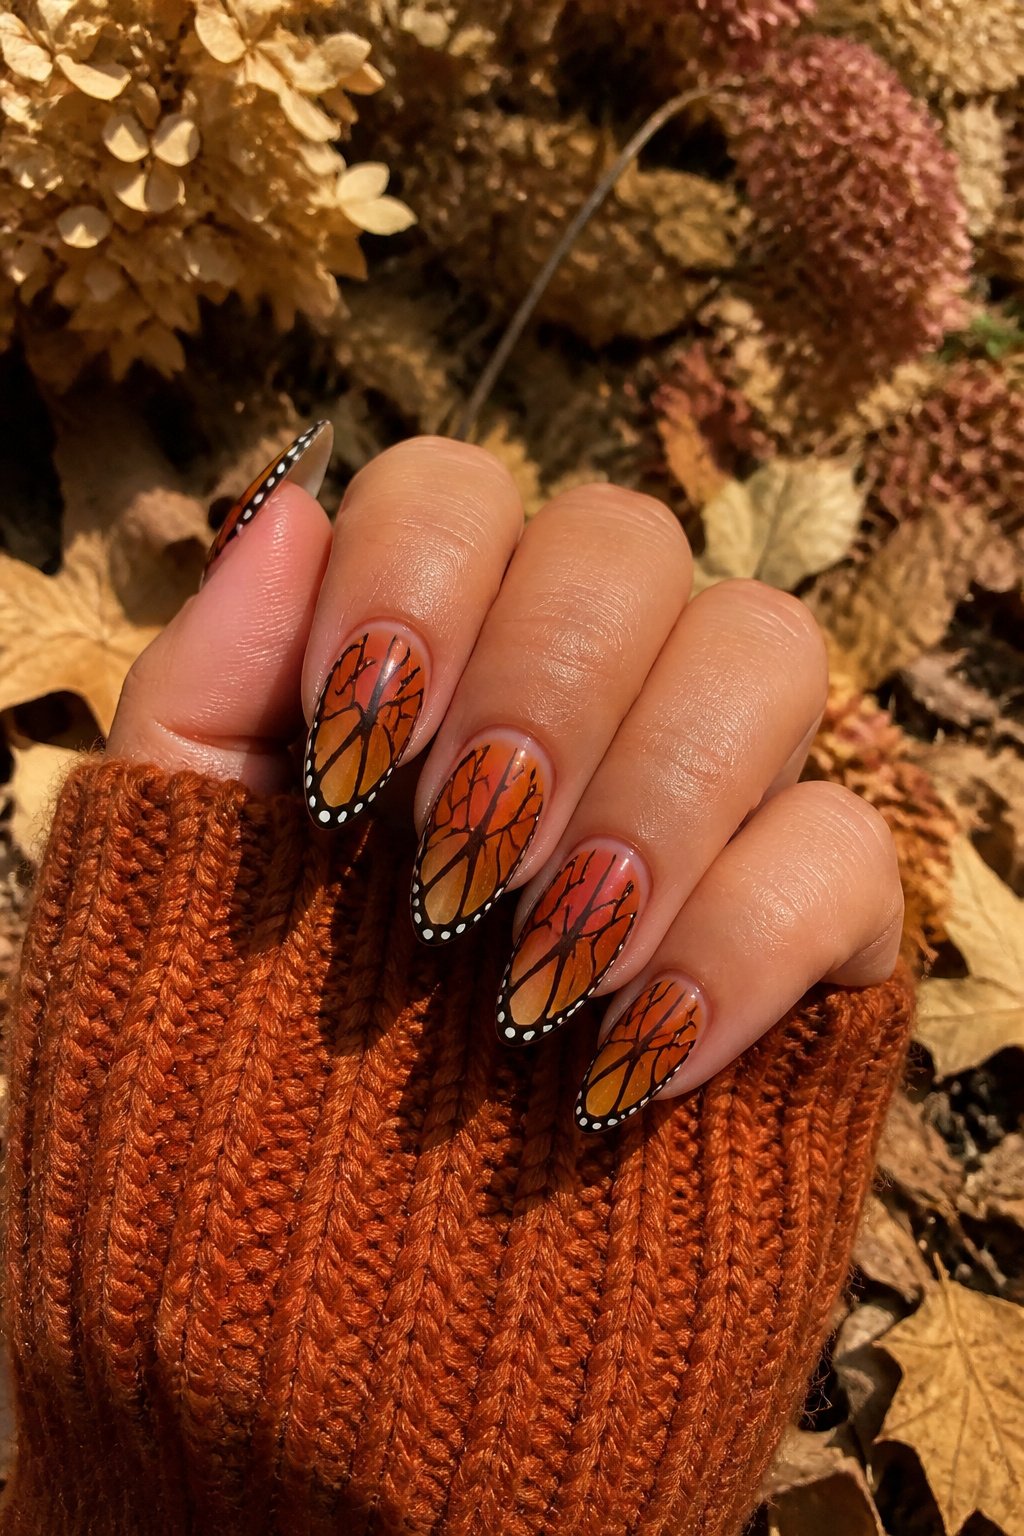
Butterfly wings for November need the same shift in palette you make with your sweaters: burnt orange, deep brown, and faded gold instead of the spring pastels that dominate most butterfly tutorials. The trick is matching the wing placement to your nail shape so the design reads as intentional, not leftover from July.
Symmetry looks stamped unless you deliberately break it. Paint the left wing first, then the right, but let the second wing sit a millimeter higher or lower. The slight offset keeps the eye moving and reads as hand-painted. For the color recipe, the igelbeauty set uses R069 Sweet Honey as a warm base, R071 I’m Not Lion for the deeper brown veining, R122 Rocket To The Stars for the gold highlights, and R127 The One to soften the edges where the wing fades into the nail. Layer the brown veining in two passes: a thin guide line while the base is tacky, then a slightly thicker stroke after full cure so the line sits on top rather than sinking in.
Press-on alternatives in this colorway run about $35 for a reusable almond set with butterfly and daisy art already applied. The daisy detail is easy enough to paint over if you want pure wing focus, or you can lean into the mix and treat the butterfly as one accent nail among the florals.
15. Subtle Glam
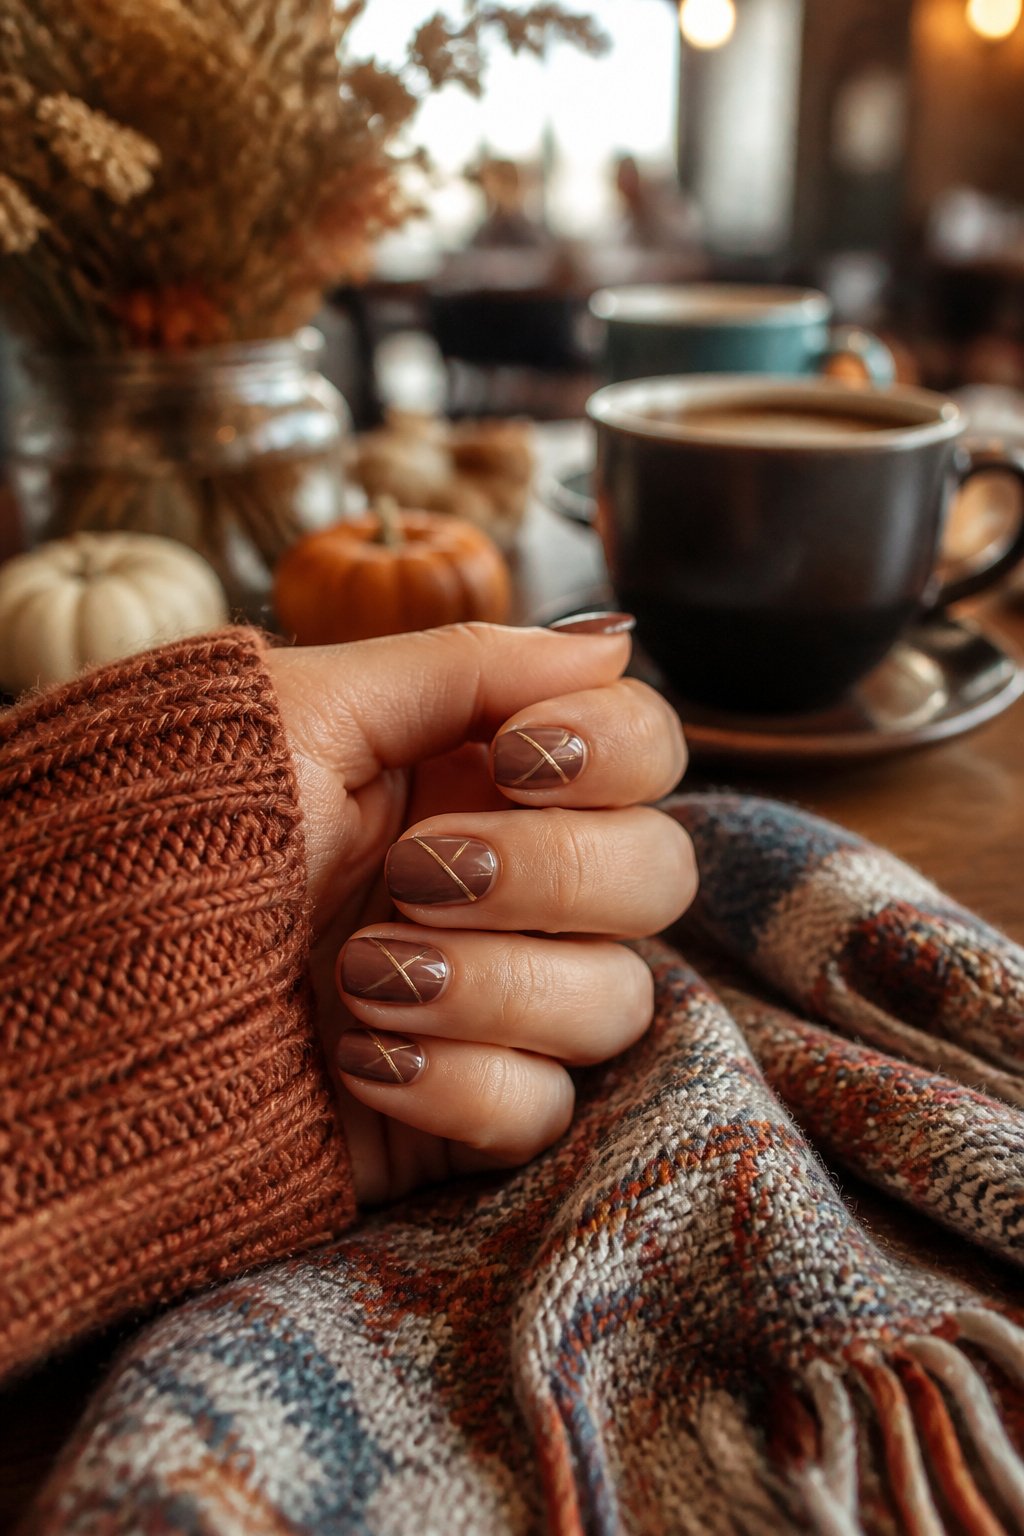
Geometric designs read quieter than full-coverage color, which makes them useful when you want nails that work at a desk and at dinner. Triangles at the base, half-moons at the cuticle, or asymmetric blocks all keep the look from feeling too literal. The shapes themselves stay crisp because the negative space does the heavy lifting; your natural nail becomes part of the composition rather than something to hide.
The detail that pulls it together is a thin metallic line, usually gold or bronze against the browns that dominate November palettes. It catches light without catching attention. Igelbeauty’s Brown Sugar, Sugary, and Sandstorm dip powders give the right muted ground for this; the metallic sits on top in a strip no wider than a hair, drawn with a striping brush or a detail tape you remove while the polish is still tacky. Too thick and it turns jewelry-store loud; too thin and it disappears under office fluorescents. One pass, barely touching the skin, is the sweet spot.
16. Brown Gradient
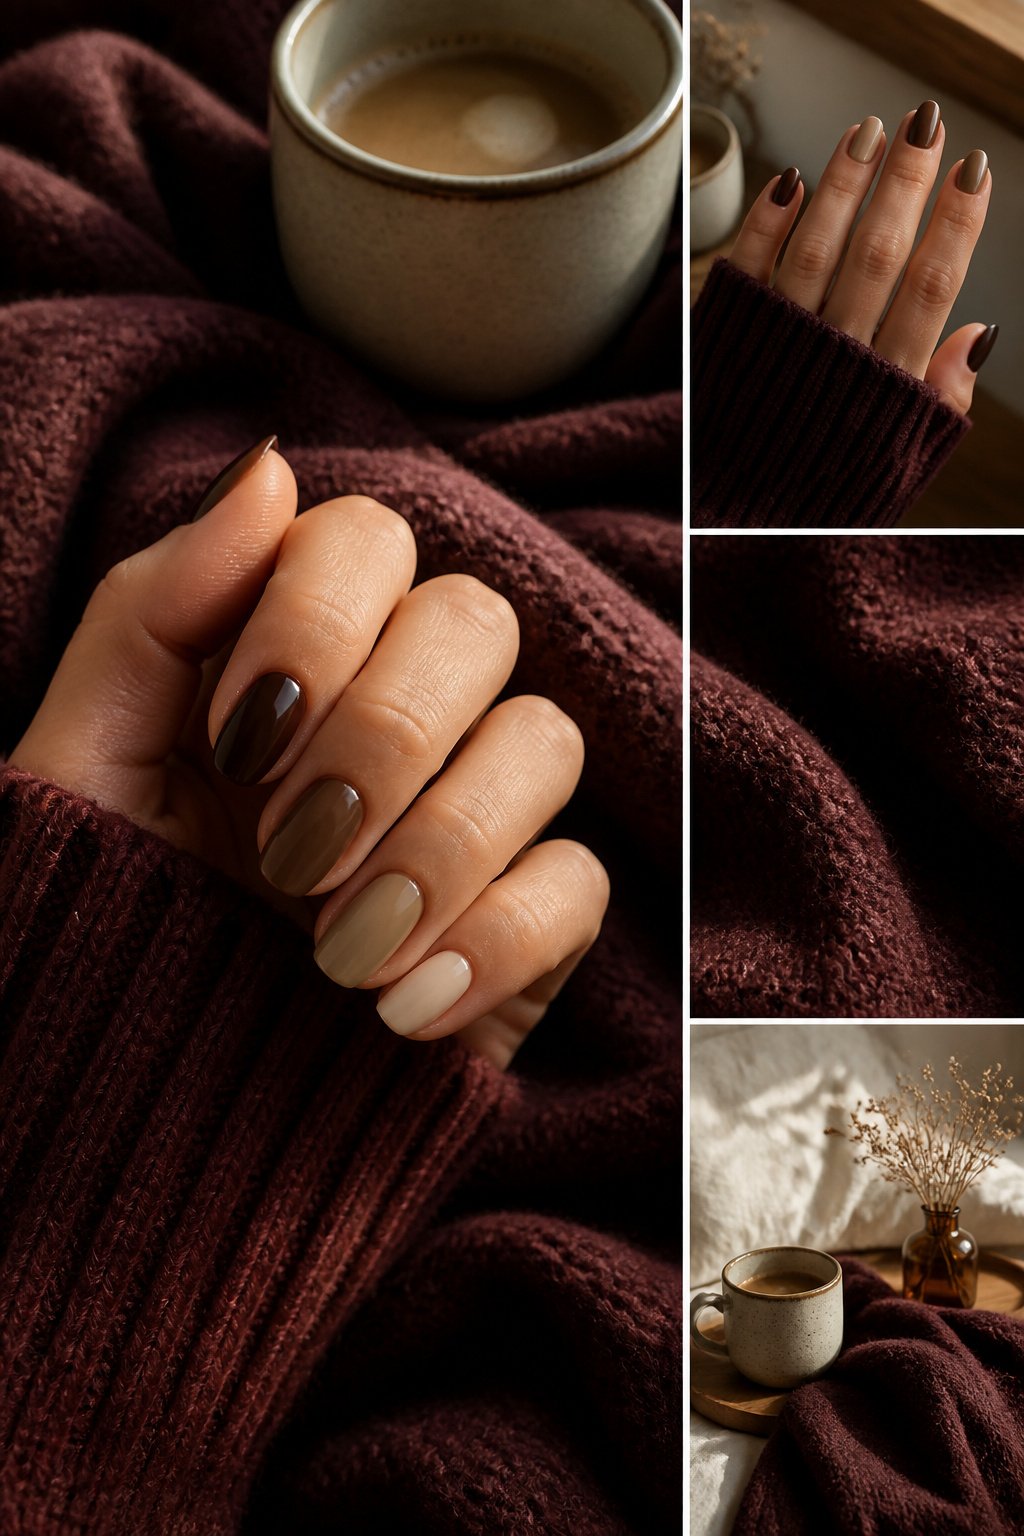
A brown gradient across the whole hand reads more sophisticated than any single shade alone. The move is to assign each nail its own tone so the eye travels from thumb to pinky in five clear steps: espresso on the thumb, a mid-tone chocolate on the index, true milk chocolate at the center, a soft camel on the ring finger, and pale latte on the pinky. Skipping a mid-step so the jump looks accidental is the mistake that turns a deliberate gradient into a mismatched set. The three middle nails carry the weight of the transition; without them, espresso beside latte just looks like you grabbed two random bottles. When I map this out, I paint the thumb and pinky first, then mix the three between shades by eye rather than trusting bottle names, since "cocoa" on one brand reads almost as light as "mocha" on another. The finish matters too. A single sheen across all five keeps the tonal story coherent; mixing matte and glossy finishes breaks the flow unless you are doing it on purpose, and this look is not the place for that particular trick.
17. Florals and Flannels
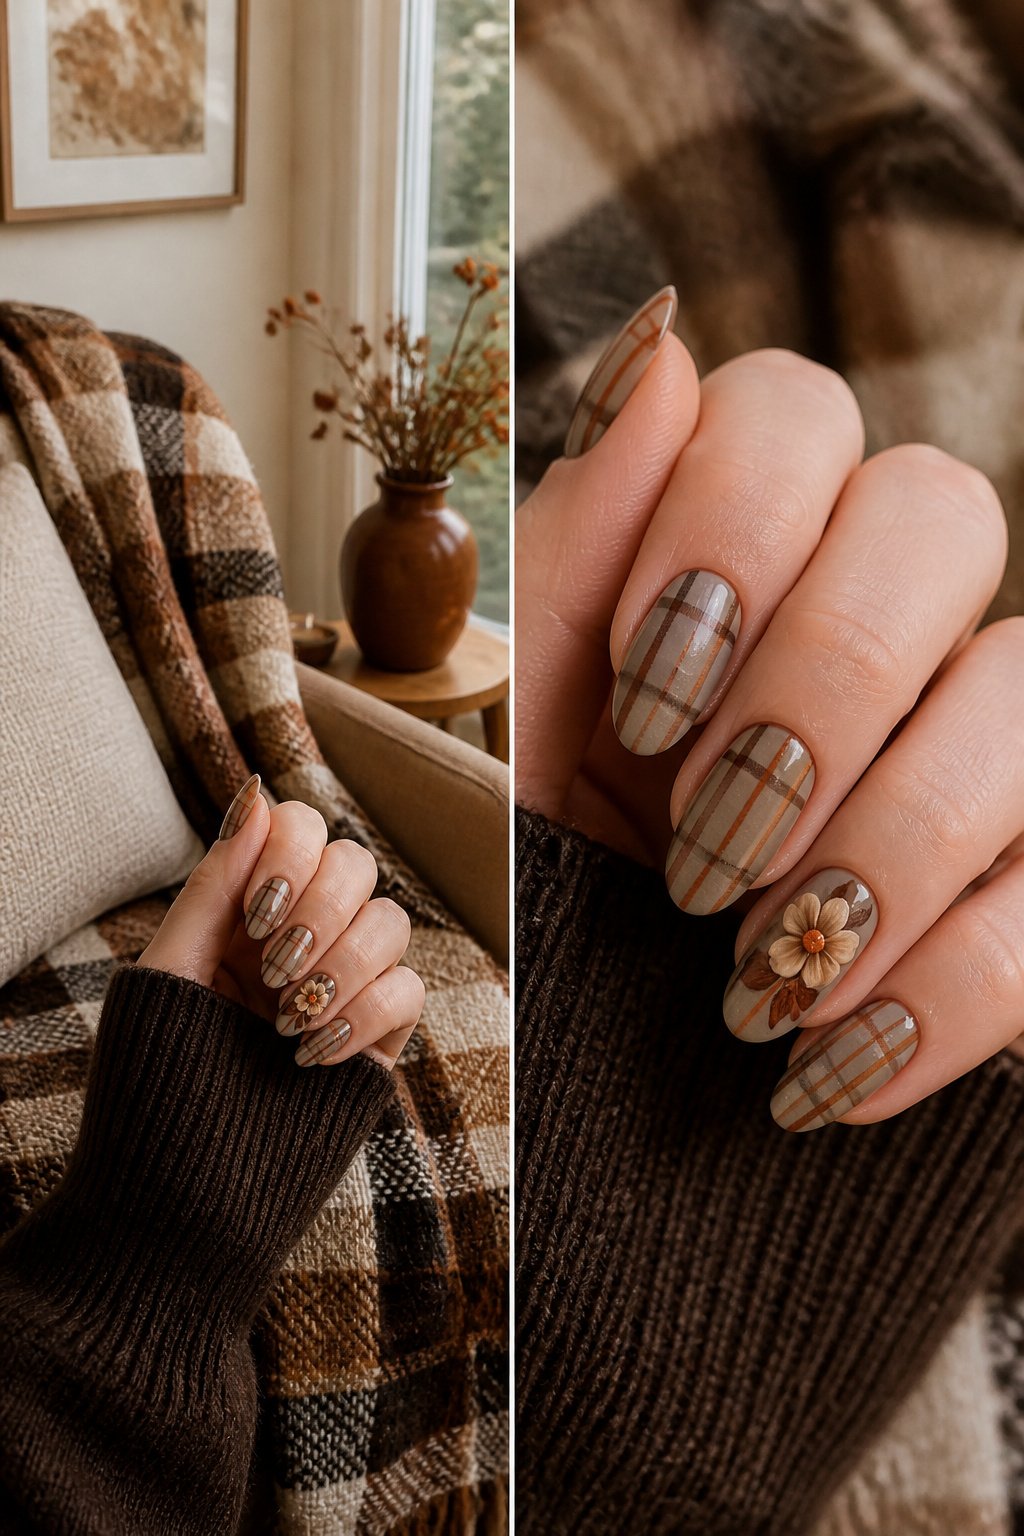
Plaid and florals on the same hand sounds like a clash until you see it done right. The base is a flannel print in two or three muted tones, nothing too busy, and the flower sits on just one nail per hand, usually the ring finger. The trick is keeping the floral tiny and scattered, like petals that fell onto fabric, not a bouquet someone pressed there. Pull the flower color straight from the plaid, no exceptions. A burgundy-and-cream check gets a burgundy bud; an olive-and-tan plaid gets an olive leaf. Introduce a fourth color and the whole thing turns into a craft project. I have seen this work best with acrylic paint over gel, since the detail brush lets you place dots small enough to read as texture from a normal distance. The matte top coat helps too. Gloss makes the plaid look like a sticker; matte lets both patterns sit in the same visual weight, which is what makes the combination feel intentional rather than accidental.
18. Glittery Gift
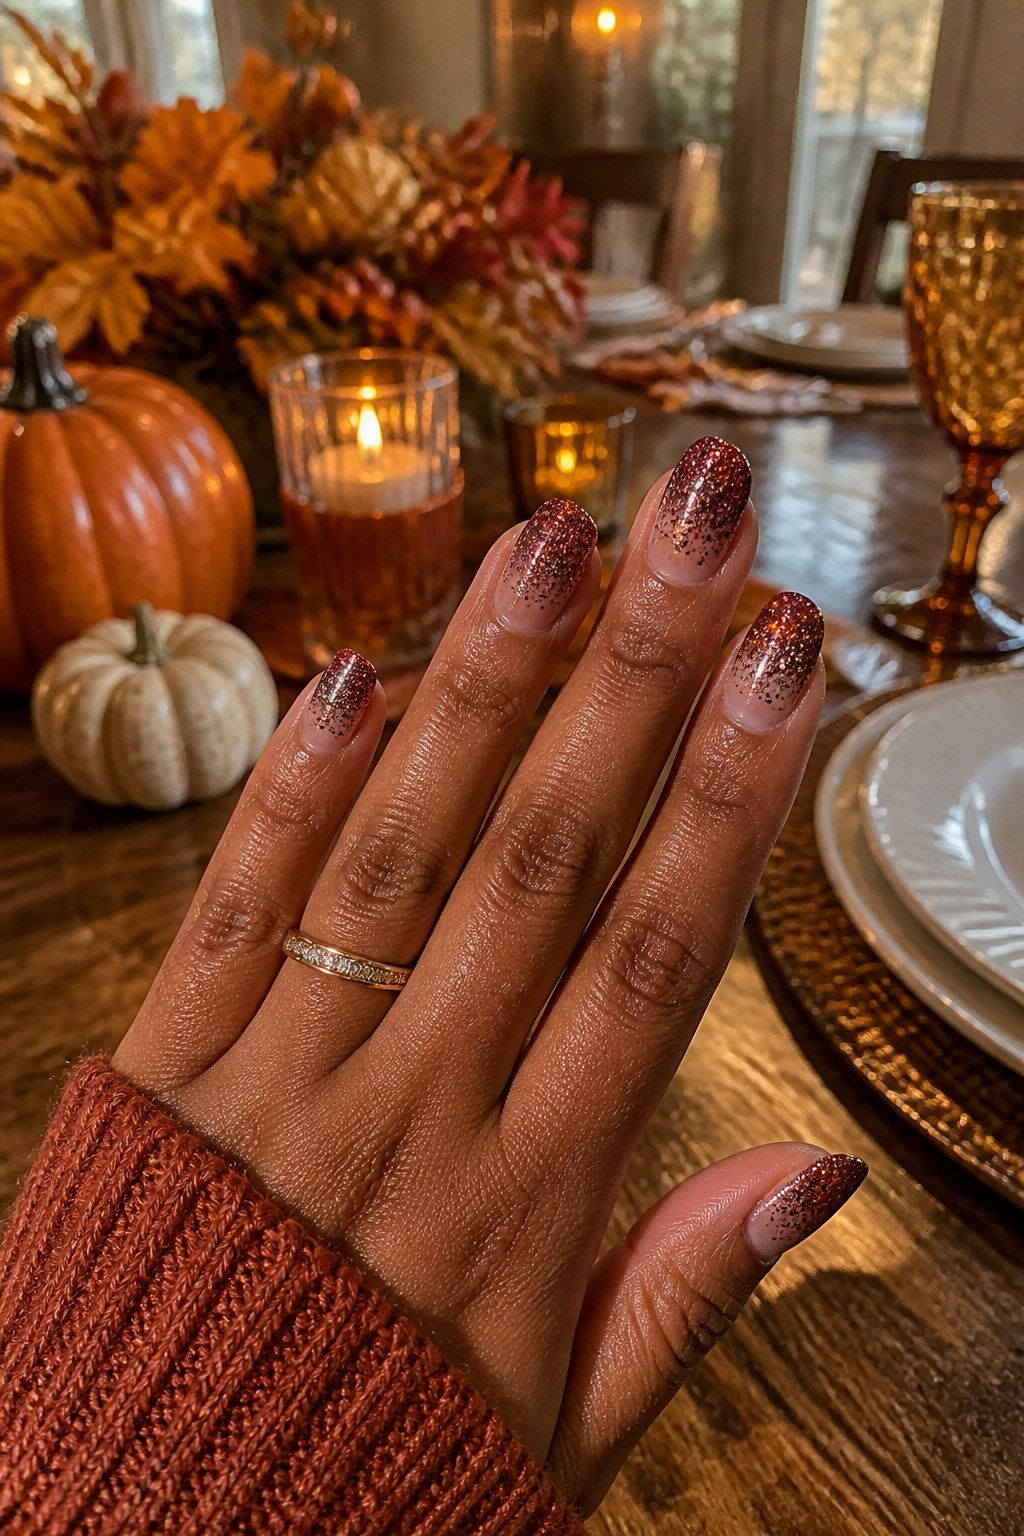
A full glitter nail and a gradient fade at the tips read completely differently under Thanksgiving table candles. The solid wall of sparkle catches light like a dress sequin, which works if you want your hands to arrive before you do. The fade, heavier at the free edge and thinning toward the cuticle, glints only when you reach for the gravy boat or lift a wine glass. That movement is what sells it as candlelight rather than craft-project fallout.
The distinction is in the glitter grade itself. Fine reflective powder, the kind that reads as a soft metallic glow rather than individual chunks, is what keeps the look hostess-appropriate. Anything coarse enough to feel gritty under a top coat belongs on a grade-school art table, not a grown woman’s Thanksgiving place setting. The reflective powder line, labeled with codes like RG05 Glam Luxe, sits at the particle size that blurs into a lit-from-within finish under dim dining room bulbs.
If you are doing this at home, the short almond shape keeps the glitter from looking like hardware. The ballerina gown shade, a muted rose-gold, bridges the gap between autumn warmth and the holiday shift ahead without demanding a full wardrobe conversation.
19. Plaid Perfection
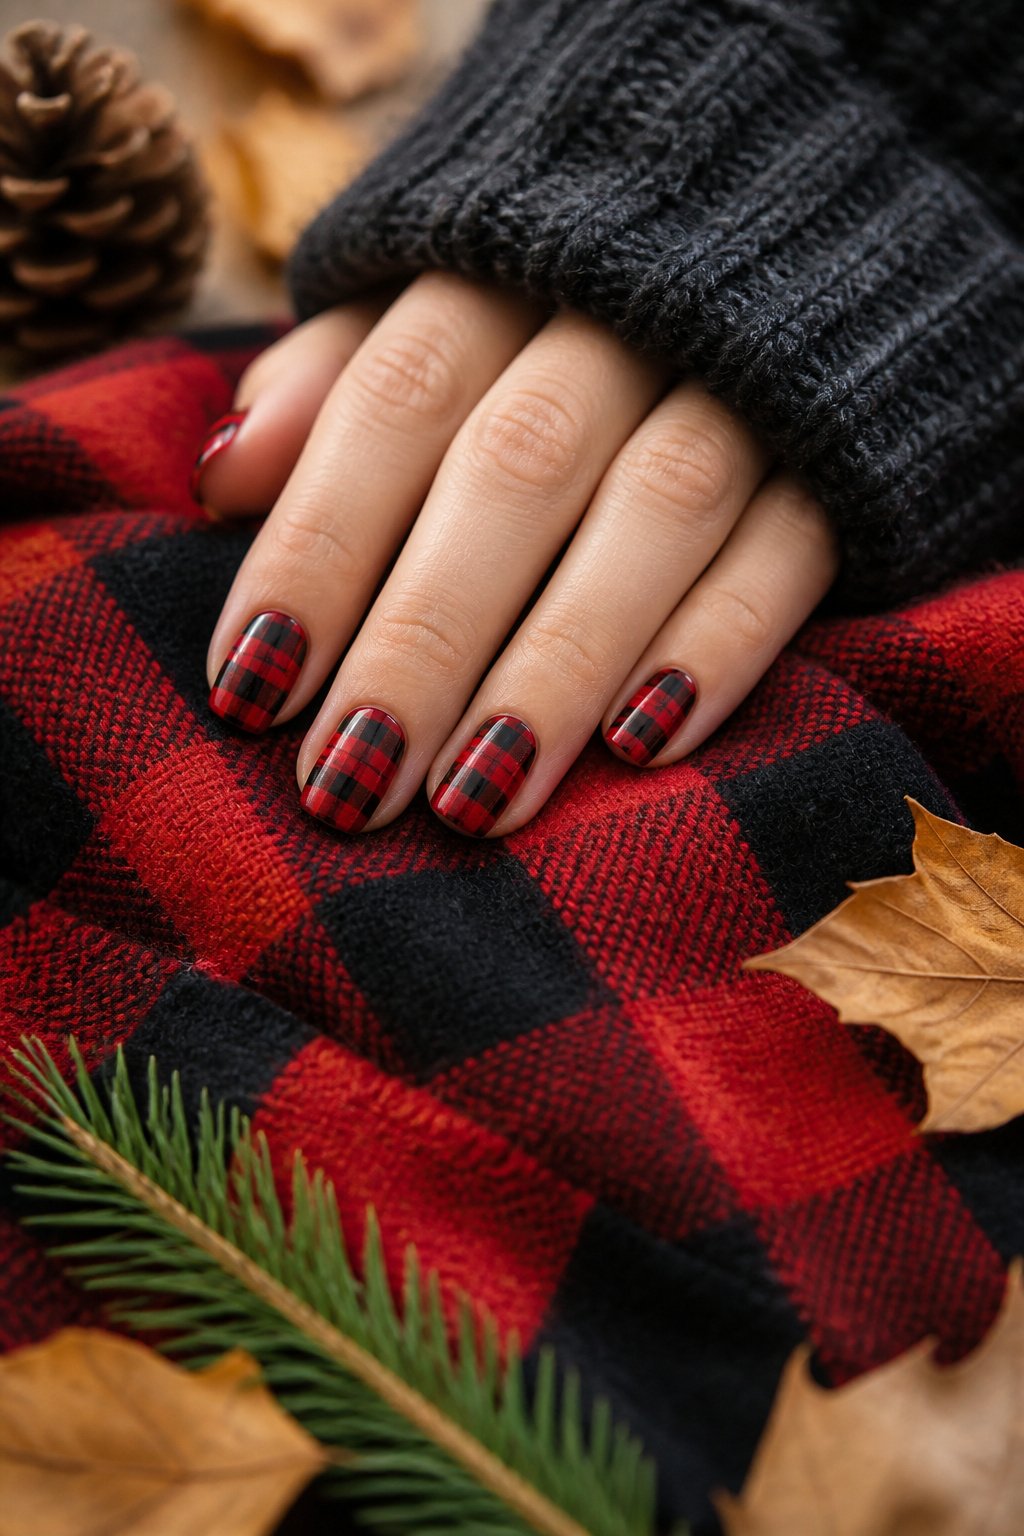
Red and black plaid nails walk a fine line between autumn polish and full lumberjack costume. The grid itself is what saves or sinks the look, and line weight does the deciding. A thin striper brush builds the grid; anything thicker turns the crosshatch into chunky blocks that read busy instead of tailored. For the filled squares, switch to a slightly heavier stroke so the solid red or black areas hold their shape without bleeding into the lines.
The base underneath matters just as much as the pattern. Burgundy grounds this squarely in November; swap it for a brighter Christmas red and the whole set shifts into holiday territory before Thanksgiving even arrives. A deep wine or dark berry base keeps the mood autumnal, sophisticated, and far enough from December to feel intentional. One pass of DD177 Teddy Bear, a warm nude from the Dip & Dap Duo line, can also work as a neutral ground if you want the plaid to do all the talking.
20. French Twist
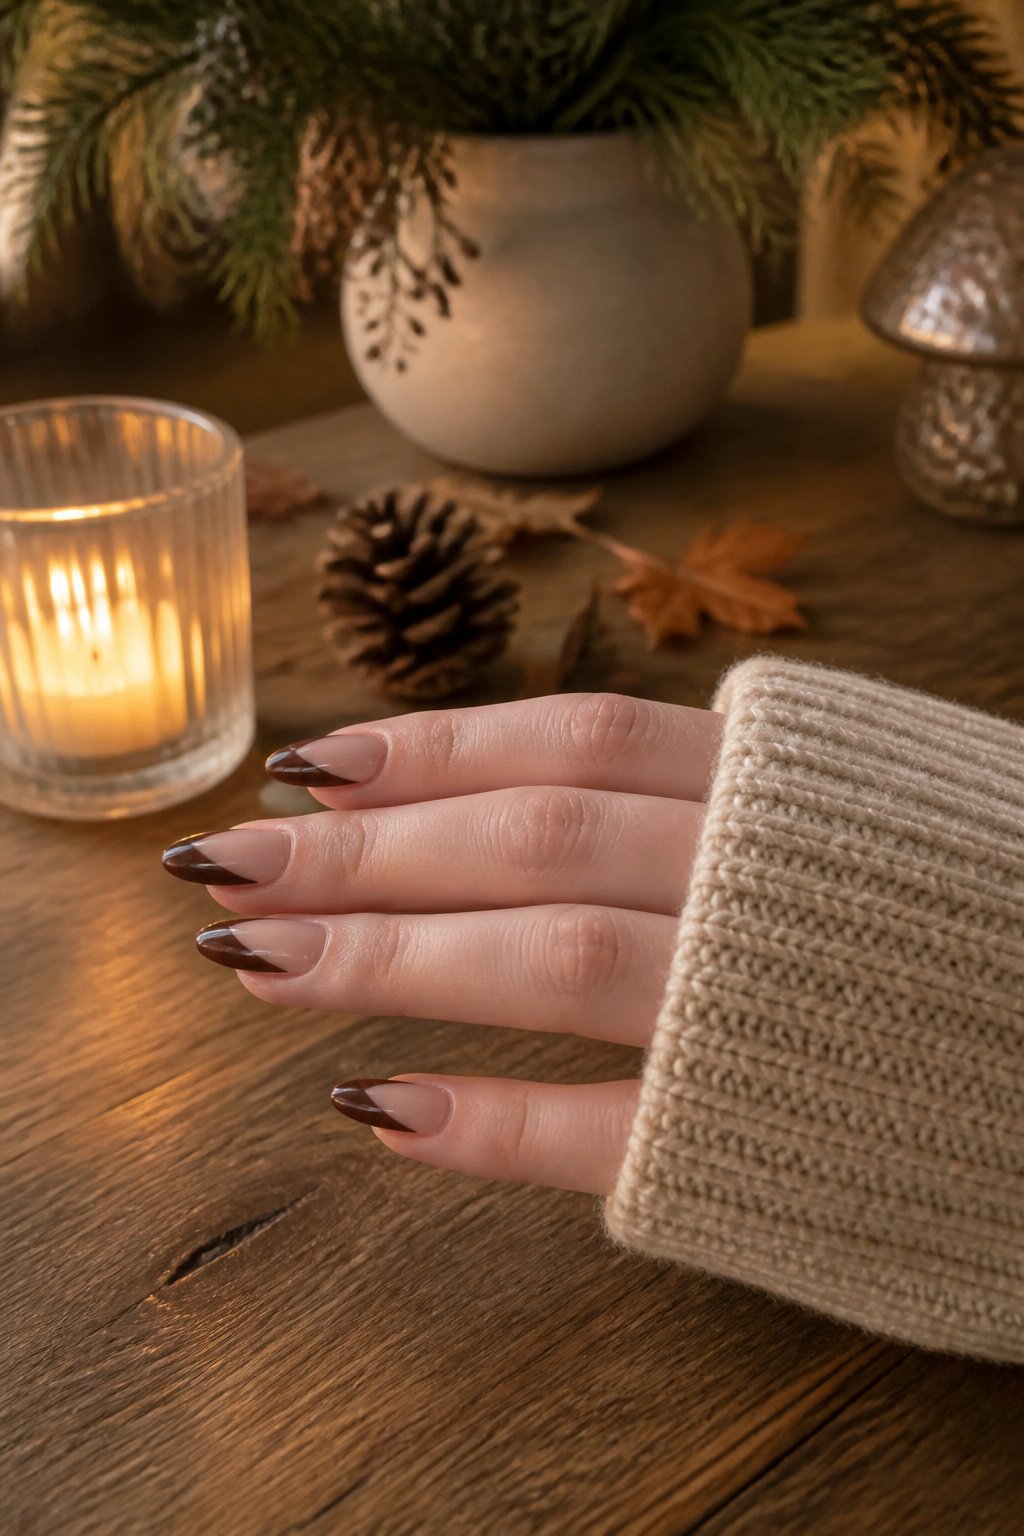
Brown side-tip French nails angle the smile line so it runs from the outer corner toward the center rather than straight across. The asymmetry reads as intentional, not like a smudged classic French, and it pairs especially well with the warm browns that dominate November palettes.
The tape placement matters more than the polish brand. I cut a thin strip of striping tape on a sharp diagonal and lay it from the free edge corner to roughly the center of the nail bed, leaving the side exposed. Two thin coats of a chocolate or chestnut tone over a nude base, then peel the tape while the second coat is still tacky. Freehand works if your brush control is steady; the tape buys you consistency on both hands.
Brown replaces white here for a softer contrast against November-pale skin. A stark white tip against skin that hasn’t seen sun since September can look harsh, almost clinical. A shade like Harmonic Tan or Secret Whispers sits in the same warm family as most winter complexions, so the line reads as definition rather than a bright interruption. The result feels like the nail equivalent of swapping a crisp white shirt for cream.
21. Sparkly Evening
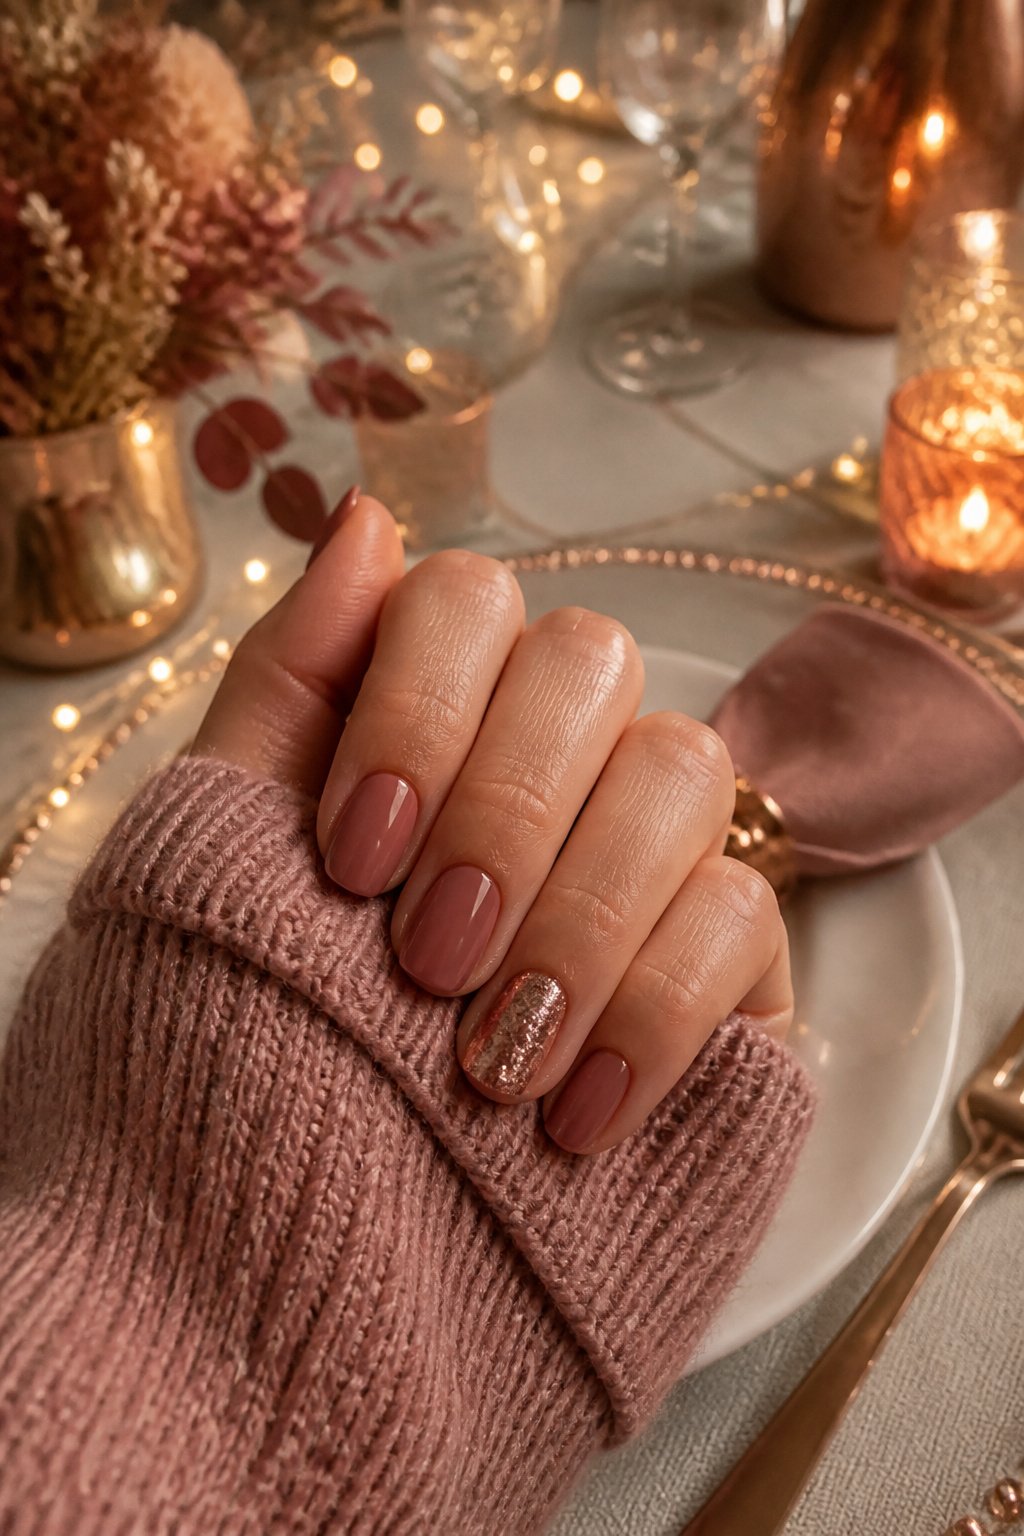
Glitter on every finger reads loud at a Friendsgiving potluck where everyone is reaching for the same casserole dish. One nail of Rosé Powder in R098 Coffee, or a single coat of R028 Morning Coffee over a nude base, carries the same signal without the cleanup. The full hand works better for the office party that always lands mid-month, when you are standing with a drink and not handling serving spoons. I have watched the same woman switch between both in a single November: accent for the night before Thanksgiving, when the kitchen is still chaos, and full glitter for the dinner itself. The Dip & Dap Reflective Powder in RG05 Glam Luxe, paired with DD009 Ballerina Gown, is what the pages keep pointing toward for that second event, though the Pro Gel Tips in Short Almond matter more than the sparkle itself. Short almond keeps the glitter from catching on sweater knits. Line Art Gel in 01 White on White can trace a thin stripe if the full reflective look feels too close to New Year’s.
22. Chic Nude
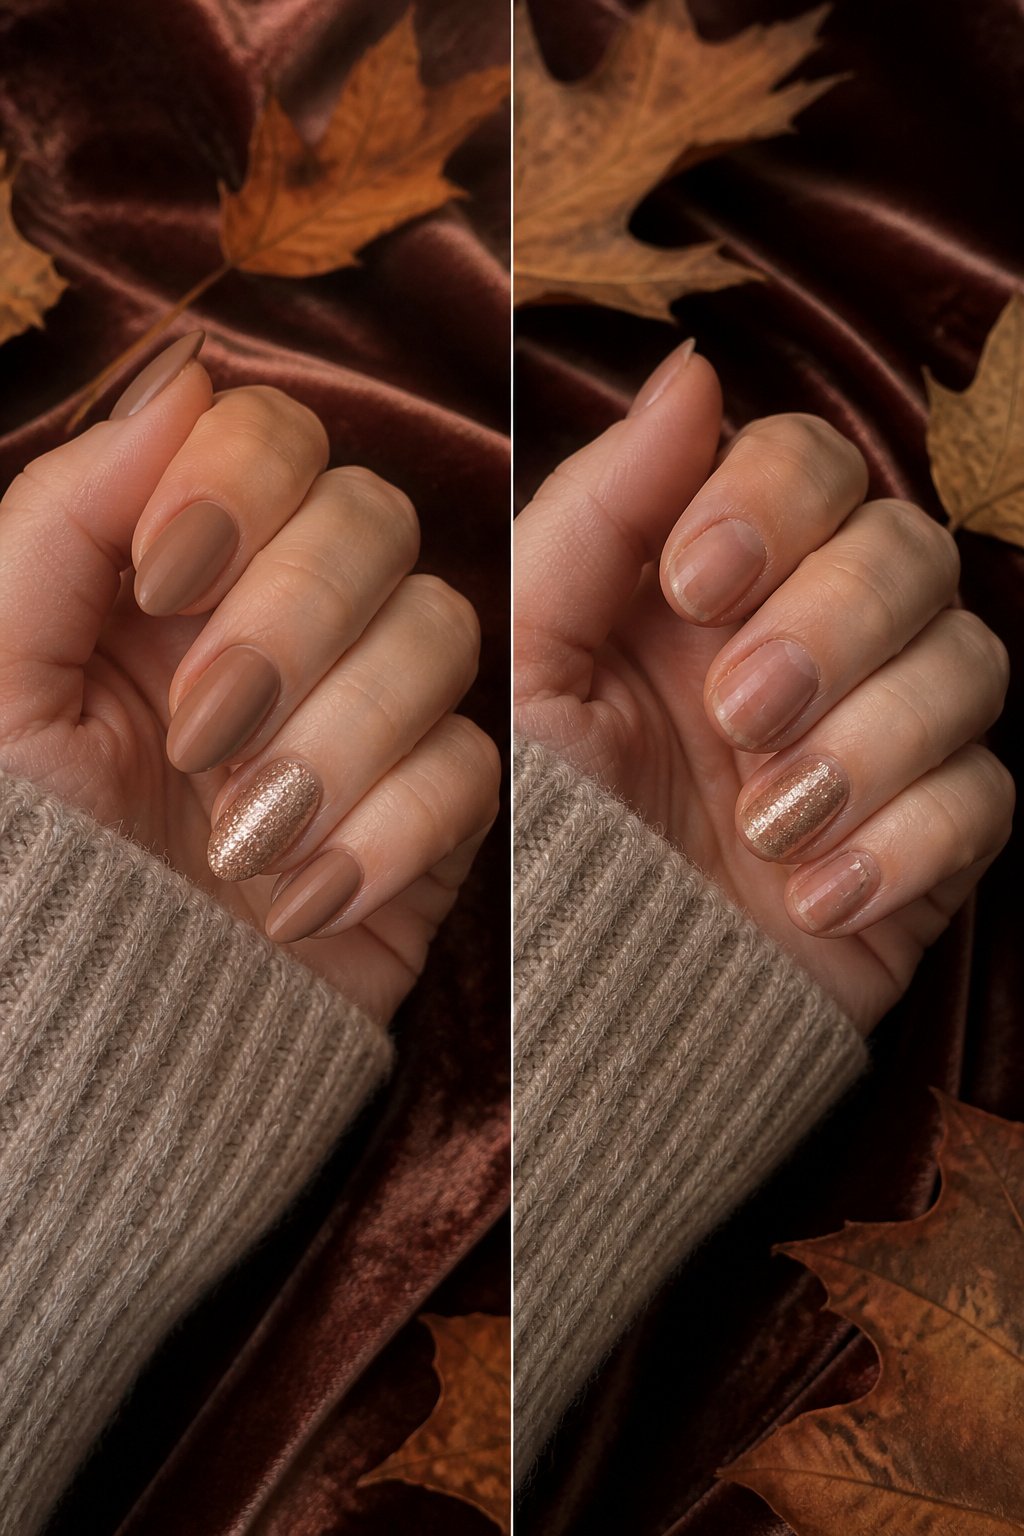
Matte polish across four nails with a single shimmer accent reads as a decision, not a half-finished manicure. The contrast in light reflection gives the eye somewhere to land without turning the whole hand into a disco ball. Matte belongs on the index, middle, and pinky; shimmer stays on the ring finger or thumb, the two spots that move most when you gesture.
The pairing works because the finishes share the same base tone. A sandy nude like DD247 Sand Storm under both keeps them related, while an iGel Matte Top Coat flattens the color into something that looks expensive against wool sleeves. The shimmer accent catches candlelight at a Thanksgiving table without competing with whatever jewelry you’re wearing.
Placement matters more than people think. Ring finger draws attention to a band; thumb shows when you hold a wine glass. Either choice looks intentional because the rest of the hand commits to the quiet finish. Skip the accent on both and the balance tips toward costume. One is enough.
23. Shiny Sweater
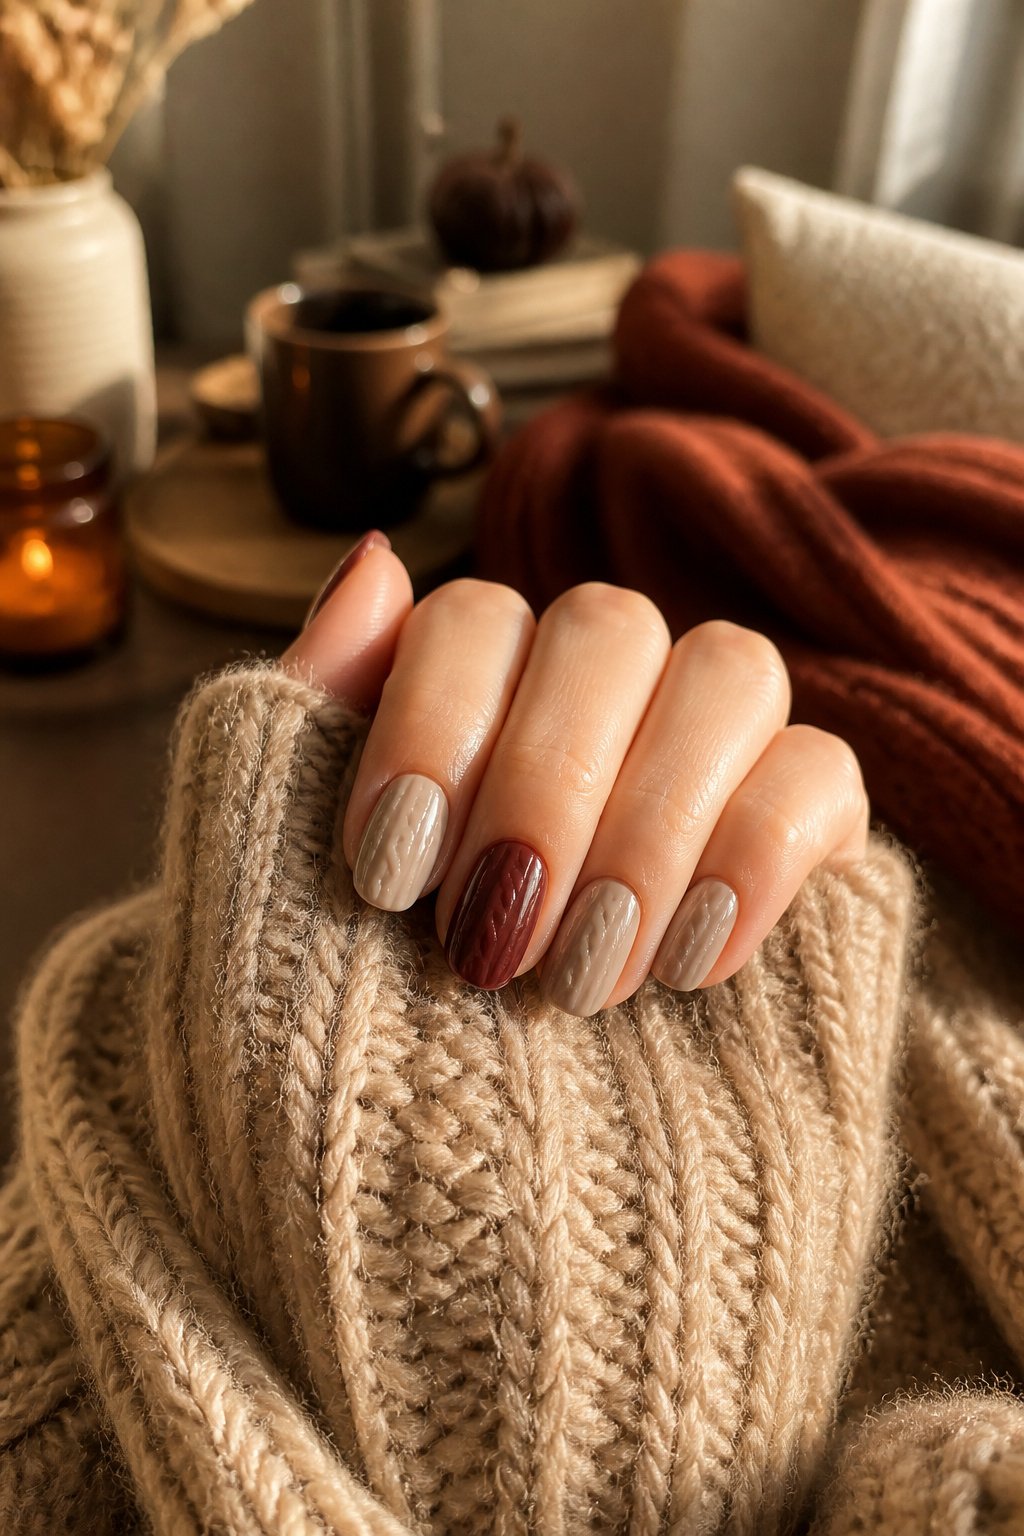
Fine ribbing catches light differently than raised cable braid, and that slight gloss is what separates a shiny sweater manicure from the matte cable-knit look trending elsewhere this season. The texture sits flatter against the nail, almost like stockinette stitch photographed under a window, with the polish itself doing the work rather than dimensional gel.
The base colors matter more here than in busier designs. Oatmeal reads warm without going yellow, heather grey carries enough depth to show the rib lines, and burgundy gives the whole thing a vintage-handknit feel that still looks intentional at a Tuesday meeting. I have seen these three used as the ground for everything from barely-there shimmer to a wet-looking top coat, and the sweater reference holds up in both cases.
What stops this from looking like unfinished art is the consistency of the line spacing. Ribbing that widens toward the cuticle or pinches at the free edge breaks the illusion instantly. A detail brush and a steady hand, or a stamping plate with a tight vertical repeat, keep the rhythm even enough that the gloss registers as yarn catching afternoon light rather than random shine.
Nail Colors That Read November
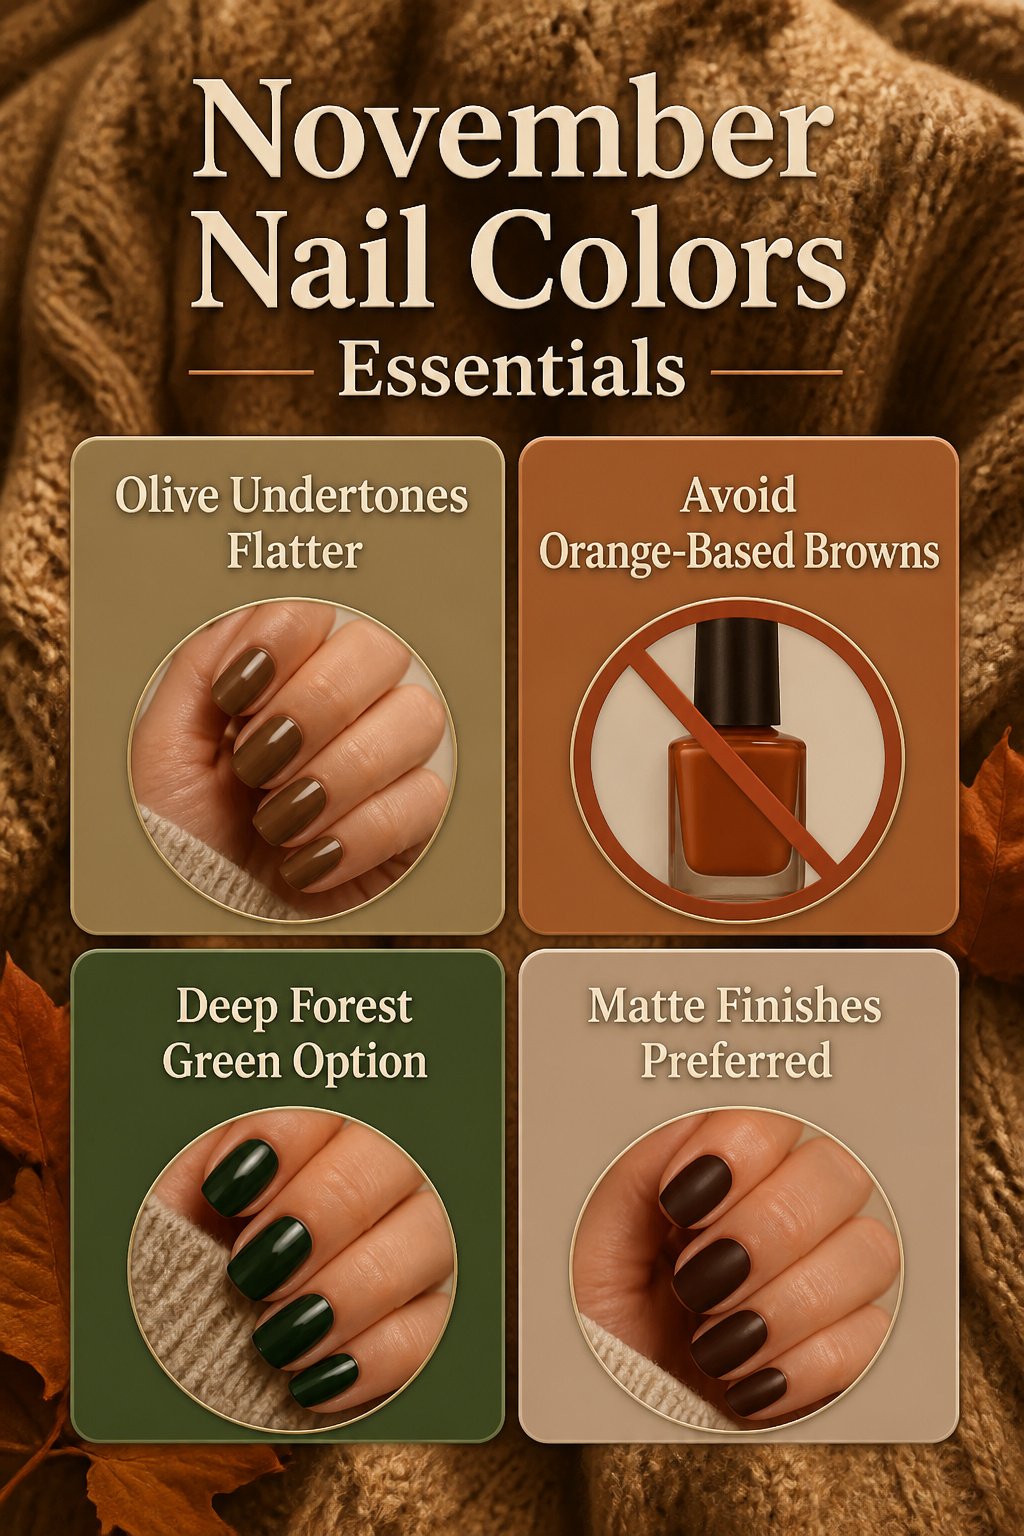
The shift from August bronze to November pallor changes which browns actually read warm on your hands. Olive and golden undertones in tan polish still flatter cooled skin; orange-based browns turn muddy. Deep forest greens carry straight through December without looking like a Christmas preview, especially with a cream or camel accent nail that bridges the two months. Chocolate brown sits in the same camp: rich enough for holiday tables, not so red that it clashes with evergreen decor. Camel and toffee shades hit a trickier spot. They peak right now, pairing with wool and tweed, but by New Year’s they can look like a leftover autumn choice against silver and ice-blue palettes. If you want one bottle to span both months, a brown with subtle green undertone, almost espresso, stays coherent longer than something that leans cinnamon. Matte finishes on these colors read more November; a soft gloss pushes them toward generic winter and loses the seasonal specificity that makes the look intentional.
Techniques Worth Learning
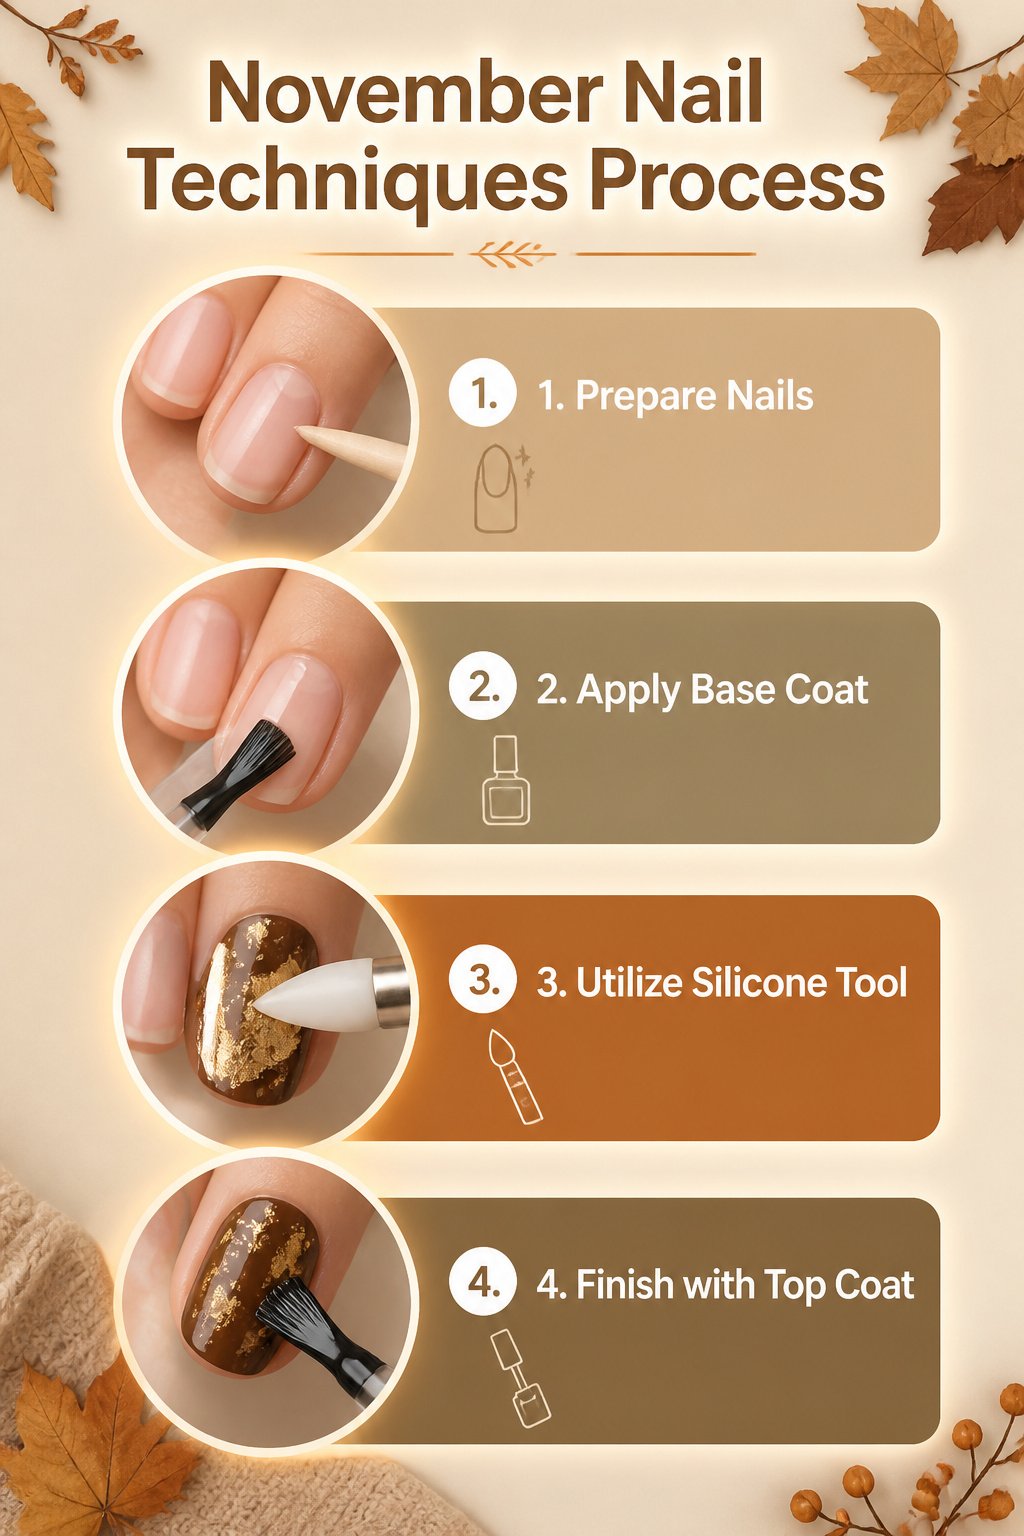
Three techniques keep showing up in the November looks worth doing more than once, and they split cleanly by how much patience they demand.
Negative space is the one that looks harder than it is. The skill level sits at beginner: you are leaving bare nail showing on purpose, not covering it, which means mistakes read as intentional gaps rather than slips. A skinny liner brush makes it possible, the kind with a two-inch stem that comes in most gel kits and gets ignored. One careful pass beats three wobbly ones, so this rewards a single attempt done slowly more than it rewards practice.
Foils read flashy but are one-attempt friendly too. The tool that matters is a silicone-tipped applicator, not your finger, which leaves oil behind and causes the foil to wrinkle where you pressed. Peel the backing, press straight down, lift without dragging. The first try usually looks better than the third, since the adhesive layer gets tackier and more forgiving with each minute it sits.
Gradients are where the time pays off. A makeup sponge cut into wedges is the tool, and the skill level is genuinely intermediate: the first two attempts will look muddy because the polish layers blend wet-into-wet too aggressively. By the fourth or fifth you learn to let the base coat flash-dry for thirty seconds before tapping the next color on top. That timing is not in the instructions on the sponge package; you learn it by doing it wrong in the same way twice.
Press-Ons and Salon Alternatives
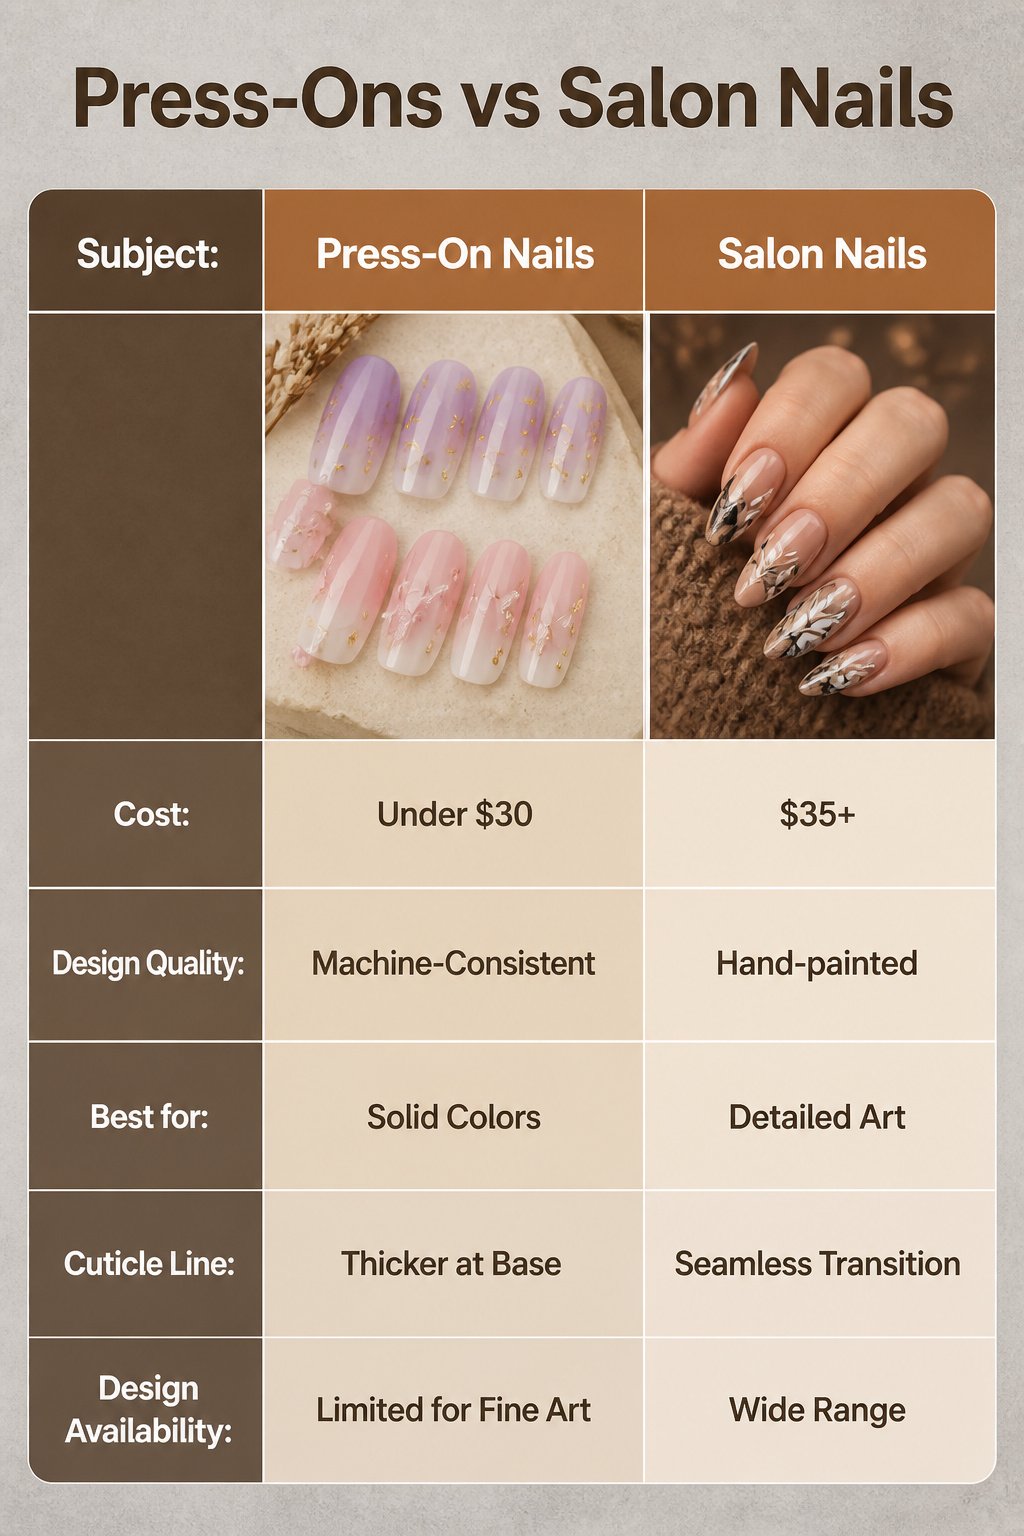
Press-on nails have come a long way from the drugstore sets that used to pop off by Tuesday afternoon. The handmade options now hitting the market, like the reusable gel sets at $35, carry enough weight in the nail bed and enough detail in the finish that they pass for salon work at conversation distance. The ombre and floral designs transfer especially well to press-on format because the gradient is machine-consistent and the 3D elements are cast, not painted freehand. What still betrays them is the cuticle line. Anything under about $30 tends to sit too thick at the base, creating that telltake shelf where the fake nail meets real skin. The lavender ombre with star accents and the pink ombre with butterfly details both rely on that seamless transition, so the brand quality threshold matters more for those than for a solid color or simple French tip. Line art and marble effects are harder to find in press-ons because the fine strokes require hand-painting, and most manufacturers skip them rather than risk wobbly results. If you want the November designs that lean on negative space or detailed leaf veining, a salon visit or a steady hand with a brush still wins.
Cold-Month Nail Care
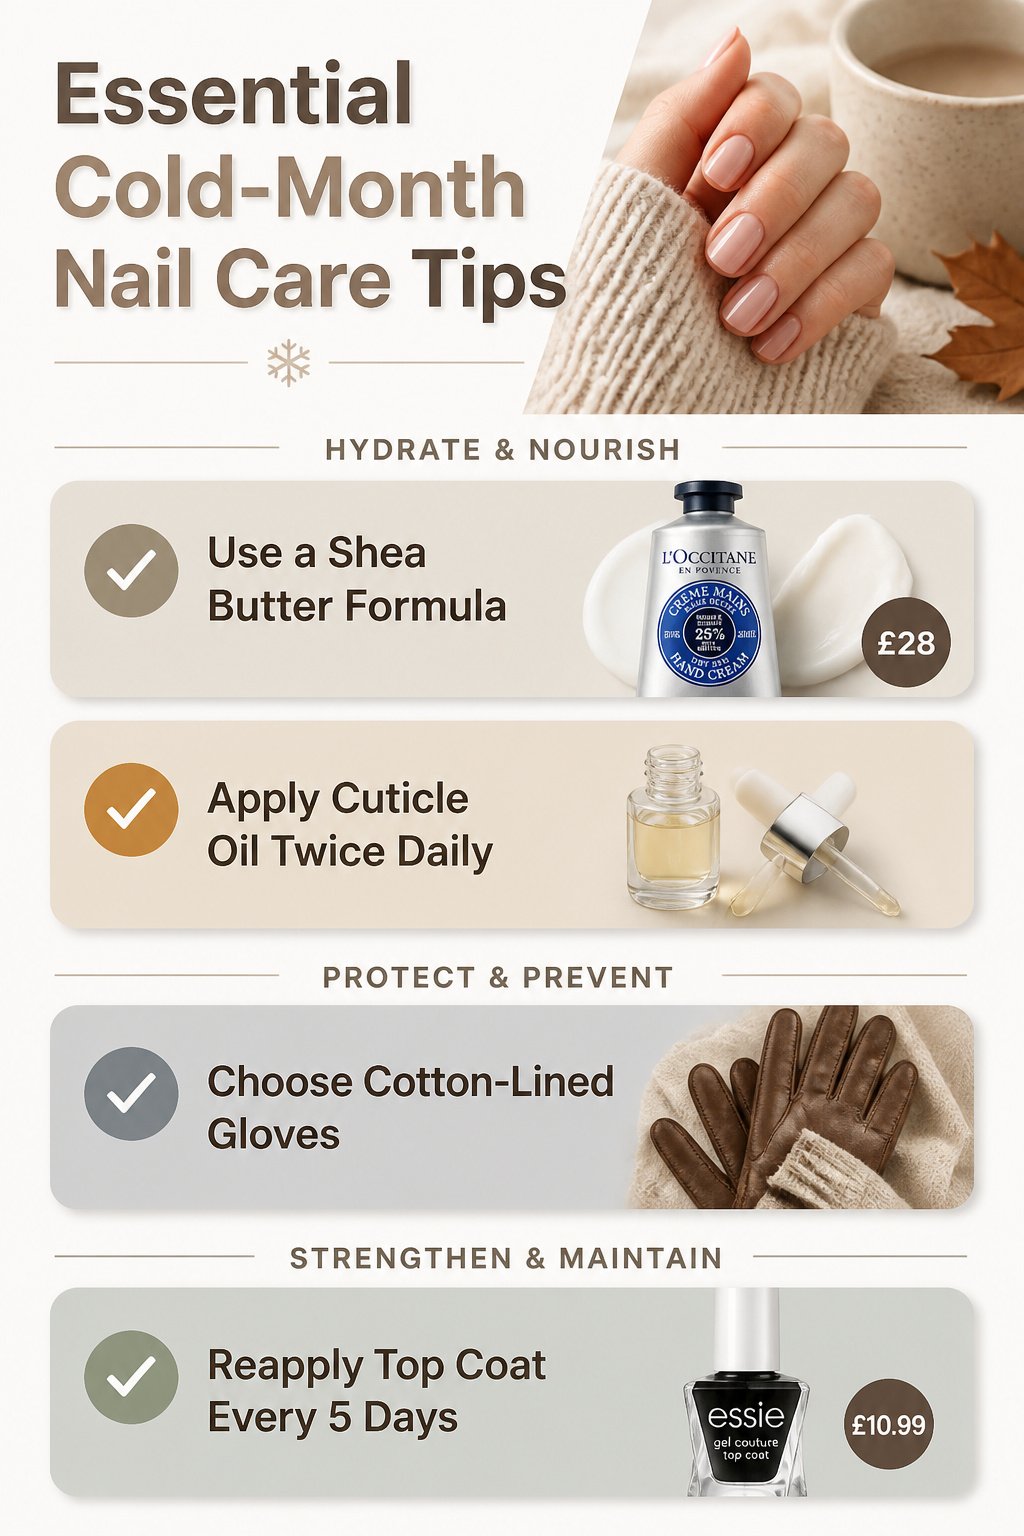
Cold air pulls moisture out of skin faster than most people notice, and by the time cuticles start catching on sweater knits, the damage is already underway. A 25% shea butter formula, like L’Occitane’s hand cream at £28, gives back what the radiator takes away; I put it on after every hand-washing and once more before bed, when skin actually has hours to absorb it. Cuticle oil matters more in November than any other month, especially if you get gel or BIAB regularly, because the removal process leaves that rim of skin stripped and prone to splitting. I run it across twice daily, morning and evening, and push the drop into the nail fold rather than letting it sit on top.
The one change that actually saves a manicure is the glove swap. Cotton-lined leather or knit gloves with smooth seams keep heat in without the acrylic or wool fibers that hook polish edges and lift fresh tips. Satin or microfiber linings work too; the point is checking the inside before you buy, since the outside texture tells you almost nothing. A glossy top coat, Essie’s Gel Couture line at £10.99, adds a hard layer that resists the micro-abrasion of daily fabric contact better than color alone. I re-layer it every five days in winter, not weekly, because the thermal shock of going from heated car to outdoor air weakens the film faster than summer humidity ever did.
What I Actually Bought
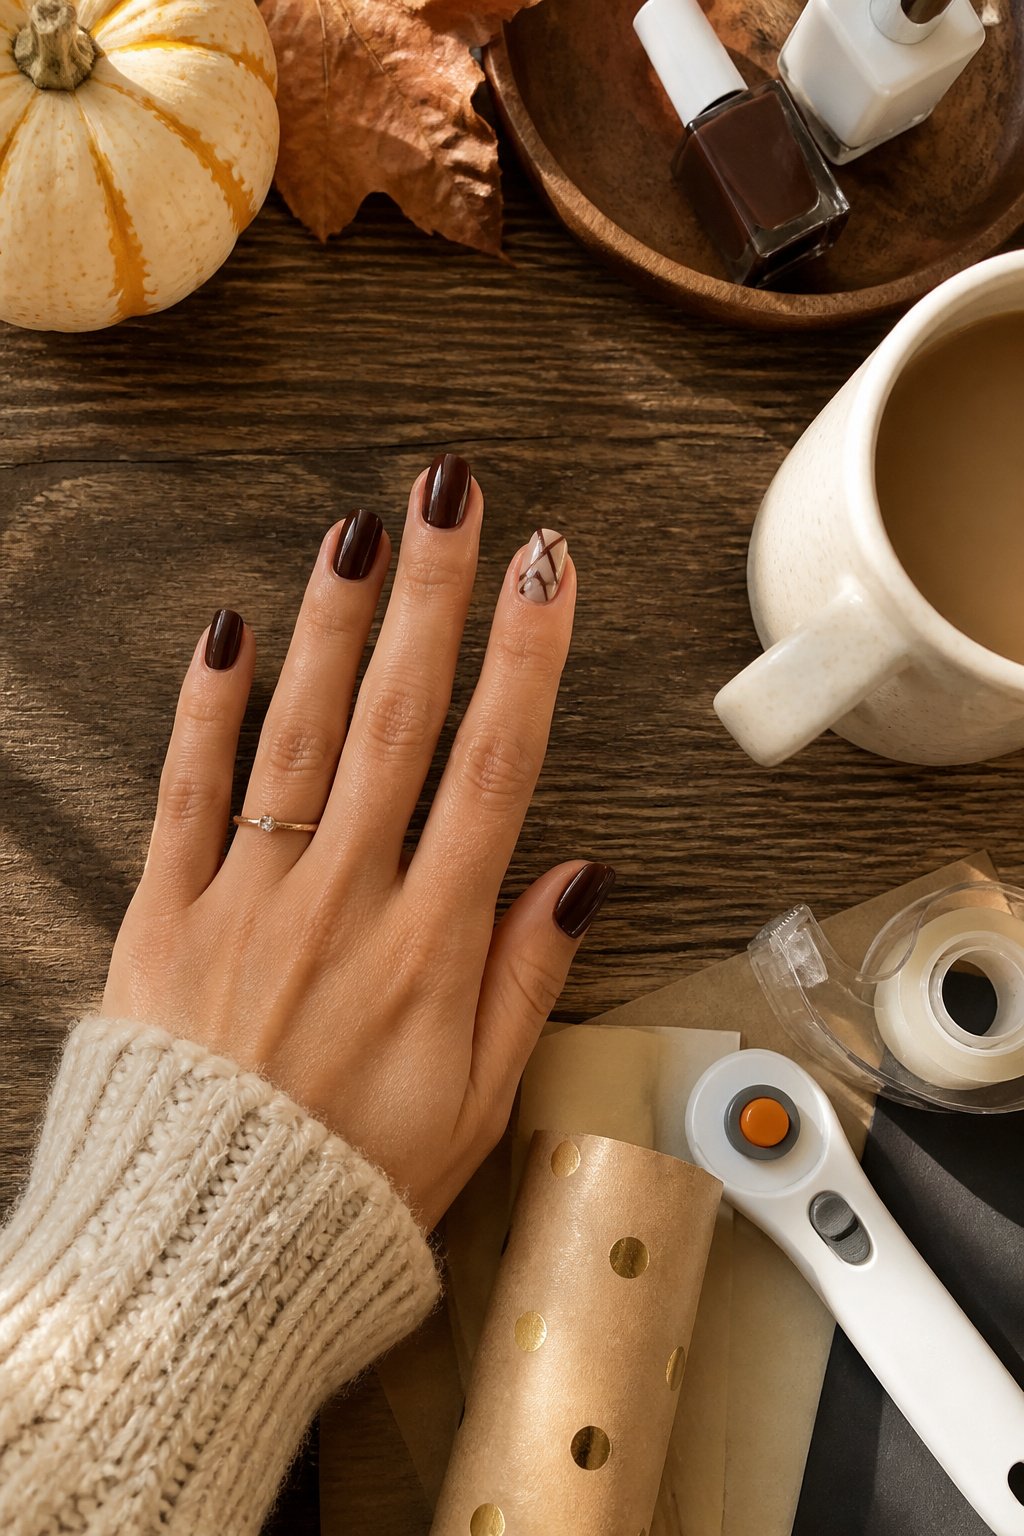
The polishes that actually made it onto my nails this November started with essie Gel Couture in Odd Squad, a dark chocolate shade that reads warmer on the nail than in the bottle, and the matching Gel-Like Top Coat. For the geometric accent nail on my ring finger, I used Dip & Dap Duo in DD179 Brown Sugar with a striping brush from an old nail-art kit, nothing special there. The tape that finally stopped bleeding under the edges was just standard Scotch gift-wrap tape cut with a rotary cutter; every "nail art tape" I ordered lifted or let polish seep.
My one real waste was a foil glue that dried before I could transfer the sheet, name long forgotten, though the foil itself from that same iGel holiday set, Tequila Sunrise, still sits unused. The stencils I tried for the subtle glam lines left a tacky residue that took acetone and patience to remove, so freehand with a steady elbow won out. Builder in a Bottle, clear, went underneath everything for the length, and L’Occitane’s shea butter hand cream, the 25% formula, got worked in while the top coat dried, since November air here already pulls moisture from the cuticles by noon.
Frequently Asked Questions
What are the best nail colors for November?
Warm browns with real depth, deep greens, and festive metallics carry the month. The most wearable browns stay in the cocoa family, deep enough to read sophisticated against skin that has lost its summer color. Forest green and chocolate brown bases let metallic foils sit back rather than shout, while caramel tones extend your wardrobe of camel coats and cream knits straight through Thanksgiving.
What nail designs are trending for November?
Autumn leaves with lengthwise gradients, plaid patterns in muted tones, and cozy matte cable-knit textures are the standouts. Negative space designs feel intentional against autumn polish, and cloud manicures keep white luminous as a reminder that winter is still arriving. Geometric shapes with thin metallic lines work for desk-to-dinner versatility.
How can I achieve a negative space nail design?
Apply base coat and let it dry fully, then place striping tape or vinyl stencils where you want bare nail to show through. Brush color over everything, and peel the tape after roughly thirty to forty seconds while the polish is still tacky enough to release cleanly. Wait too long and the tape lifts color underneath; peel too early and edges feather, so timing is the whole challenge.